Science Engineering Project: Improvement and Scientific Explanation

How I Would Improve It

Due to printing issues, I was incapable of improving on the project. However, I did spend some time at home stabilizing the structure. The majority of other improvements I would make is miniaturizing the wiring for the AC to DC converter.

How it works:

The AC generator works through Faraday’s law, which states a changing B-field will create a movement of electric charge. The design used has a generator stator and rotor, with the rotor containing a few strong magnets.

The stator is consisted of 3 pairs of wire coils (These are commonly named as Inductors) with the paired coils on the opposite end and the three pairs are separated by 120° of angular distance.

Following Faraday’s law, we may observe that when the rotor, which has magnets to produce a magnetic field, moves, the changing B-field would cause a movement of electrons. As the magnet approaches 180 degrees of rotation, the B-field would become opposite to as it was in the beginning, causing the electrons to flow the other way. This is how AC current is created. I utilized the Wye connection formation to connect the three coils (This generator is technically named the three-phase generator as it produced 3 separate AC Voltage waves each 120° or 2/3 Radians apart). This formation connects the three coils to allow the current to flow.

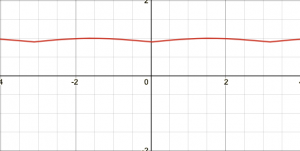
The AC to DC converter is slightly more complicated. The device uses a group of diodes to run the sinusoid curve function of AC Voltage through an absolute value function (i.e. turns the direction of the electrons to always one direction, but does not ensure they move at the same speed). The function now looks like a bunch of humps, as can be observed from the graphed images. Then, this new function is run through a large amount of capacitors.

These capacitors are used in a special case: They will try to maintain a stable electromotive force (emf) between its two ends (place the capacitors in parallel to the load. If placed in series, a different effect will occur), meaning that it will attempt to smoothen the curve. They do this by storing electrons when there is too much emf and release electrons when there is too little emf. Following multiple capacitors, the voltage would be smooth enough for most household items to use as well as to charge batteries.

Science Engineering Project: Develop and Plan

The project which I have chosen to do is the AC generator. I spend a few hours producing an adequate model for the 3D printers to work with. The design was easily printable within a week, with the AC generator done in only 3 days. After managing the restrictions which the 3D printers bring, as well as the fact that printing only is available in the day, I managed to create a final design which I used. This model can be publicly viewed and downloaded for offline manipulation in fusion 360. All necessary details were included in the model (Access to fusion 360 would allow for a better view of the model as well as capabilities for manipulating it)

Science Engineering Project: Planning and Designing

I had several ideas for this project, a few of which would be far too difficult to accomplish. Originally, I was thinking of creating a regenerative braking system. Regenerative braking is essentially a way to regain electricity the rotation of the wheel. For instance, most of the major car companies have this system in place. This works by gaining energy by reversing the motor into a generator.

This design was particularly difficult because I did not have the resources to automatically switch to circuit between charging mode and driving mode (school did not have the switch to do that). My second design was to create an AC generator (which is used in the industrial level to power major civilian centers) with a AC to DC converter to charge a battery. The AC generator is particularly interesting as it is the only type of generator use in industrial scale energy production.

The turbine to turn turn the generator was designed as a Tesla turbine, which functions as a bladeless turbine utilizing the boundary-layer effect to rotate (with a maximum efficiency of ≈95%). This is preferable to other methods of turning the rotor as the tesla turbine has a far higher efficiency and does not depend on steam or other similar sources which may be environmentally damaging. The design for this project would be annoying as it would have to rely greatly on 3D printing to create the appropriate shapes.

The third design was an ion drive. Ion engines use ionization to create a flow of air or fuel (or in rocketry, ions/elections themselves) in order to generate energy. The dangers of making one is immense, and is likely to cause death if a shock is to occur (I was originally expecting around 8-10kV for the Ion drive to create the desired thrust). It is evident in this fact that it is too dangerous to build, albeit very eco-friendly. I will not include a video as I do not indorse the construction of such devices outside of a safe environment.

My final design was the most ridiculous, which was to create a simple turbojet. I quickly removed this from the possibilities due to the dangers of handling jet fuel and of the combustion of air needed for regular function of the jet engine. I will not include a video for this as no explanation is needed for why I did not choose this.

The Paper Menagerie

In Ken Liu’s short story “The Paper Menagerie”, Jack, the main character, develops his understanding of his identity through the author’s use of character interactions, [Symbols], and [POV].

The author’s use of character interactions assists in the development of Jack’s understanding of his identity. One of the key identifiers is how Jack’s personal thoughts or narration was affected by his interactions with different characters. For instance, proceeding the second dinkus (i.e., around the fortieth paragraph), Jack interacts with the neighborhood boy Mark. After this interaction, which involved the damage of Mark’s toy, an Obi-Wan Kenobi action figure, Jack antagonizes and victimizes his Chinese mom. In particular, after spending long periods at school, one can notice that Jack appears to become more racist. This is demonstrated through his violent dialogue towards his mother, in which he loudly and shamelessly demanded his mother to “Speak English!”. Later, the narrator expressed that he would not have spoken to his mother unless she spoke in English. This can indicate that his interactions and dialogue with external factors such as racist neighbors and teachers would cause a change in personal identity

On the sidewalk bleeding

The main character, Andy, in Evan Hunter’s short story entitled “On the Sidewalk Bleeding” initially believes that he was a Royal and that he was uninjured, but later understands that he was Andy and that he was dying. His changing understanding is revealed through the use of the environment, personal thoughts, and interactions with other people.

  • “He did not know why his voice had deserted him, or why there was an open hole in his body from which his life ran readily, steadily, or why the rain had become so suddenly fierce.”
  • “Now, in the alley, with the cold rain washing his hot body, he wondered about the meaning. If he died, he was Andy. He was not a Royal. He was simply Andy, and he was dead.”
  • “Andy lifted his face from the sidewalk, and his eyes said: Please, please help me,”

Door Alarm with Sew-on LEDs and the CPX

My project was a door alarm that used the accelerometer to detect door openings. My plan originally wanted to hide the processor behind felt with holes in the felt base for lights and controls. It also had the processor on the bottom and had a width far greater than the processor. The four lights were designated to the four corners of the felt. The keycard also had a similar processor design and also had a green light on top to represent if the keycard is activated.
Due to the extreme difficulty of installing the processor upsidedown, it was altered to face up while sewed on the front. As the entire processing unit became fully visible, the built-in green LED was used instead of the sew-on LED. Additionally, the processor on the alarm was moved to the top as it seemed easier to access with the keycard. The phrase “keep out” was kept. In doing so, the additional four lights had to be moved from the four corners to four points arranged in a rectangle which circumscribed the circular processor.
One of the most important things I learned was how to decrease the amount of thread and materials needed to make an item. The amount of felt used in the original design was nearly thrice as much as the finalized product. I decreased this by compacting the battery case, LEDs, and the sewed-on words. In doing so, I also limited my conductive thread usage. I would recommend decreasing the complexity of the sewing so that it would take up less time. This is mainly to improve the quality of the code, which will make the final product more immersive. It is also beneficial to begin work on the programming before the project is to be started.

Animal Petting Zoo for Grade 1

Reflection:

Recently, the class “Robotics and coding” has started a new unit. We will make robot animals that will react to what we do. We learned to use the Microbit. It is a device that can be programmed to complete simple tasks such as turning a motor, detecting light, or, say, show a smile. The Microbit can be programmed online. We are supposed to use the microbit and its motors to create a moving animal (My motors work but the light sensors don’t). My animal is a turtle. It includes a head (detachable), a shell (the front can be opened), two front arms, and two back legs (or…maybe feet?). My code basically says that if a light=less (because the hand will block light when petting the turtle), the turtle’s head will look left and right (my servo still doesn’t work, although I can use my hand to conduct the currents from the Microbit to the “2”…This does work).

The turtle includes a flat shell (I didn’t have time to work out the dimensions of a round shell). Two arms stick out of the middle body part. They can move due to a thin layer of solidified hot glue. The arms are two layers thick while the legs are only one layer thick. If the Microbit is standing up (logo up), the 5×5 display will show a smiley face with eyes that look left and right. If the head is pressed hard enough, one of the buttons would be pressed. This would make the turtle’s arms move up and down.

I began to design the turtle by carving out an oval (24′ by 12′ (I Think ‘ means inch)). Next, I designed the 1 layer arm (*4). The top shell was actually broken into eight pieces as I thought there wouldn’t be enough cardboard left (there was). The Head was the last part to be designed.