Formal Elements in Photography

Formal Elements

Formal Elements is the basic compositional elements of photographs, consisting of line, shape, pattern, texture, tone and focus. Photographs that utilize these compositional elements tend to invoke interest or other emotions from viewers, or otherwise exhibit various other feelings, commonly emphasizing the authorial intent that a photographer may have.

Lines

Line, being one of the six formal elements, is quite apparent and common throughout objects. Lines, when combined in various angles or lengths, could compose shapes, but lines, to me, represent one part of the physical dimensions that any object may have, or the object itself, in difference from other objects that may be in the foreground or background, or otherwise separated from this object. Commonly, lines are mostly regarded when they are straight, but lines could also include arcs or any sort of line that may be apparent in the photograph or nature. Lines are most notable in abstract photographs if they are used in a repetitive manner or with a certain direction.

Converging lines | Large Do you think this is what the archi… | Flickr
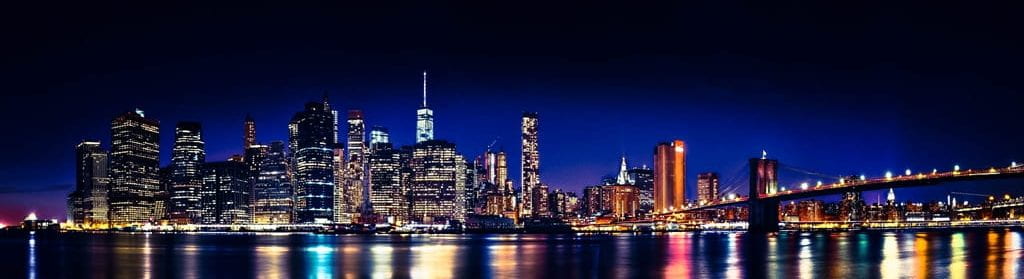
“Converging Lines” (Dooley)

In this example, horizontal lines along the photograph invokes interest since it is a prevalent element of this photograph. The repetition of lines seem to suggest the verticality of the structure (what I’m assuming is the side of a building), or perhaps also reflective of the stark emptiness and lack of use of this structure. The shadow and the barriers/protruding objects also add vertical lines into the mix, which contrasts well with the horizontal lines of the stairs.

Shape

Shapes, to me, is a combination of lines in such a way that it forms a geometric shape of some sort, which is commonly made using the outline or silhouette of objects. Shapes, like lines, are very commonly found and generally make up all objects or parts of objects within a photograph. For it to be significant, shapes are often used in patterns of repetition in such a manner that shapes would become a motif or a prevalent element within a photograph.

Free Black and White Diamond Shape Wallpaper Stock Photo

(Buchi)

In this photograph, the predominant formal element present is geometric shapes that is made up from the structural design of this object, what seems to perhaps be of a building. The lines at various angles form multiple shapes of triangles which composes the entire picture, with sharp angles that seem to stick out and a curvature to the shapes to add variation to the pattern of shapes.

Texture

Texture mostly pertains to the physical qualities that a shape or object may have, commonly capturing the details of the surface of an object, whether it be coarse or smooth. With the inclusion of texture, more visual detail is captured within the picture and thus invokes interest, depth or contrast.

(Pelletier)

This photo contains many other formal elements, but the focus on tactile texture is arguably the main compositional element of this photograph. The wavy pattern on the leave seem to imply coarseness, but otherwise attracts due to its extreme attention to detail that is normally not noticeable. Texture, in this image, goes hand in hand with elements such as lines, which are quite prevalent with the stems and surface of the leaf forming varying lines.

Value/Tone

Tone (or Value) refers to the range of lightness or brightness, differing between portions of a picture. In other words, tone pertains to the percieving of light combined with color when captured by the image. In most instances, this would pertain to gray tones between white and black, especially in black-and-white photography in which tone is quite significant. Tone usually amounts to contrast and depth being portrayed in an image, but could also pertain to an illusion of form or the creation of some sort of invoking mood.

“Ghastly Arches” (K)

This image utilizes tone by adjusting the image to resemble black and white pictures, providing contrast between the light cast by the light fixtures and the foliage surrounding the arches. The colors used in the picture itself are also adjusted to be colder or tinted blue to invoke feelings of coldness and, perhaps, melancholy.

Focus

The element of focus pertains to the sharpness or bluriness of objects within the image. Being controlled manually by the depth of field, this allows for certain objects within an image to be put at the center of attention or at a specific perspective, as well as portraying depth, all of which contribute to attracting interest to a specific portion of the photograph.

(Schulenburg)

In this image, a shallow depth of field is used to direct interest and focus towards the bird and the tree that it is on, therefore resulting in the background being blurry and the bird being sharp in the picture. The use of focus also is indicative of depth by portraying the bird and tree to be in the foreground whereas the other scenery or foilage is in the background.

Can Formal Elements be used One at a Time?

I don’t think so. All of the photos above, for example, portray multiple formal elements within the image. Of course, many pictures may have a formal element be more prevalent, but it is virtually impossible for a picture to only contain one of the few elements. All of these elements are closely related to each other, making it not really possible for only one to be used at a time.

Abstract Photography

To me, an abstract photo portrays an image in such an unusual way that it provokes thought or interpretation from a viewer. Typically, abstract images tend to be aesthetically pleasing and pleasing to the eye but intentionally limit the subject of the picture not to the object portrayed within the photograph but to compositional elements of the abstract image, commonly attributes or qualities of the object or its surroundings.

The Pictorialism Movement was a movement for photography to be considered more of a form of art on par with paintings instead of simply depicting reality. Photographers in this movement tended to focus on an image’s beauty, tonality and composition rather than visual accuracy. Although ideas inspiring this movement have existed since the 1850s, such as from painter William John Newton, this movement was the most active between 1885 and 1915, in which photographs were generally manipulated to increase their artistic impact, many times to produce stories or otherwise deeper meaning within images. This movement has inspired innovation for newer photography techniques and other artistic movements, laying the foundation for aspects of modern photography.

In contrast, the straight photography movement was a movement for producing more detailed and visually realistic images by tending to not manipulate taken pictures and strictly depicting objects as portrayed on the camera. To achieve a pure effect, the image is generally not edited at any stage of the photo-making process, including taking the photo, editing in the darkroom, or through digital editing. This movement was the foundation for many other movements, such as documentary, photojournalism and abstract photography. Ultimately, this was a prevalent movement due to the appearance of amateur cameras and their dominance in advertising, design, and journalism.

Aaron Siskind was influenced by straight photography by including elements of abstraction within the pictures, effectively combining them. In his photographs, a style reminiscent of straight photography is used in which aspects of the image are kept visually realistic yet include elements of abstraction with how the subject is unclear at the initial viewing. In other words, Siskind utilized straight photography’s influence to portray something intentionally in an abstract manner.

Photos taken by Andreas Gursky and Uta Barth are abstract in that their photos include compositional elements that invoke interest or curiosity when viewed, inspiring consideration into the image, and having no clear subject and, in some of their pictures, repetition of such elements. I would consider Gursky to be more of a straight photographer since many of his images are weighed in reality and use techniques commonly seen with straight photography, such as sharper photographs with immaculate details and no obvious modification to the image itself while portraying complex landscapes. I would also consider Barth a straight photographer, depending on the image, since many of her pictures incorporate a sharp focus and lack of subject for an effect of abstraction. However, most of her other photos modify the focus and have an object that could be considered as the subject of the photograph, although it is placed in such a manner that it would take consideration to determine the subject.

Engineering Blogpost #4

Pictures and video of the final product (2nd prototype):

Photo of the body of the 2nd prototype.
Front view of the 2nd prototype.

IMG_3097 (Link to a video showing me manually spinning the axle to demonstrate the functionality of the rubber band winding on the 2nd prototype)

(1st prototype:)

IMG_3062 (Link to a video showing the winding and releasing of the 1st prototype)

Top view of completed prototype #1.

I intended on my product to rely on elastic energy to propel the car forwards, thereby resulting in kinetic energy. When the vehicle is pulled backward, the spinning of the back axle results in the winding of the rubber band around the back axle, which results in tension applied on the rubber band and the rubber band extending longer, which prepares and expands the elastic potential energy stored in the rubber band. When the car is released, the tension from the rubber band is released and the rubber band contracts, where the back axle spins with assistance and as a result of the contracting action of the back axle. The back axle is connected to wheels which, when turned, will result in the car being propelled forwards (kinetic energy). Although some energy is lost in the form of thermal energy (due to friction) and sound energy (from the “snapping” of the contracting rubber band, the intended output (kinetic energy) is achieved before the car slows down due to friction. Thus, the toy begins with elastic (potential) energy, then leads to mechanical energy (spinning of the axle), and consequently ends with kinetic energy (movement of the car).

It is of my opinion that I was largely successful in producing a functional test prototype that primarily works as intended, allowing me to test the product and analyze improvements that I can make. I was also quite successful in the development and plan stage of the design project because I believe that I have made a good plan that details the product that I will make, albeit with a few discrepancies and mistakes.

I think I can improve on my time management since I could have used my time more wisely and had finished my project as a result. I also believe that I could work on the aesthetics and design elements of the product. Although my product looks decent with neat laser-cut edges wood, I could possibly add windows, doors, or other etched decorations onto the body to improve the looks of the product.

The product is primarily intended for children to learn about energy change and at the same time have a toy that they can play around with, resulting in the children (which is the target audience/client) having fun and learning at the same time. The adjustable position of the rubber band (in the 1st prototype) can also allow for the client to explore how initially tensioning or relaxing the rubber band will affect the movement of the car, allowing for analysis of this toy as part of an experiment. I also envisioned so that objects could be placed on top of the car (on the roof), allowing for more experimentation and seeing how added mass will affect the distance traveled or other factors.

The impact my product has on the environment is not too positive, since I relied on laser-cut wood to make my product. Some areas that could be sustainable or more friendly to the environment include the straws to hold the axles, which can be made from used straws to support sustainability, and the skewers acting as axles, which can be made from used or reused skewers.


Engineering Blogpost #3

Design class #1: I focused my time this lesson entirely on the template of the car since the chassis and body of the car are to be laser-cut. I also gathered some of the materials needed (skewers, straws) and inquired about the 3mm plywood and laser-cutting machine.

In the initial draft for the template, I focused on recreating the general shape of the car.
Finished template layout

Design class #2: I prepared the finished template for laser printing by rearranging the pieces. I decided to print out the chassis and sides only to test the skewers and elasticity of the rubber bands. For me to be able to test the prototype, I used wood glue to stick the pieces together. I learned that I should use painter’s tape to temporarily hold the wood pieces in place and for the wood glue to set.

I marked the areas to cut the straw/axle holders as well.

Prototype pieces that were cut out and stuck together with wood glue.
Top view of prototype.
Prototype with axle holders (straws) installed, not cut.

Design class #3: I finished up the 1st prototype by cutting parts of the straws off to hold the axle as well as cutting off parts of a skewer to act as an axle. After that, I have used hot glue and painter’s tape to secure the elastic band onto the body and the back axle. I have decided to not use a dowel/skewer to hold both ends of the rubber band. Instead, I will glue the rubber band directly on it.

I used painter’s tape to attach the elastic band to the body so I could experiment with placing the elastic band on different parts of the body.

Top view of completed prototype #1.
Another view of the first prototype. Note that the side pieces are bent.

IMG_3062 (Link to a video of the first prototype being tested)

Design class #4: Because of the 1st prototype not being cut properly (and after feedback given from peers in regards to the bent sides), I decided to laser cut all of the pieces again, including the bumper, hood, and top piece. Because there was a queue for the laser-cutting machine, I waited for most of the class to get my wood pieces cut. I also used wood glue and stuck the pieces together.

I dismantled parts of my 1st Prototype to measure the skewer length and straw length and make adjustments from thereon.

Picture of the body of 2nd prototype.
Photo of the 1st and 2nd Prototype together.

Design lesson #5: Parts of the body of the 2nd Prototype did not stick properly. I spent some time regluing certain parts of the car. I’ve also noticed that I have miscalculated the length and width of the car, resulting in the inaccuracy of some parts. I attached the rubber band to the back axle, but I did not have enough time to finish the front axle and attach wheels onto the car.

If I had more time, I would finish attaching the wheels to the car and then thoroughly test it out.

Front view of the 2nd prototype.
Close-up of the front. As you can see, some parts are misaligned.
Back view of the 2nd prototype, showing the back axle in place.


Engineering Blogpost #2

Sketch/plan of the product

For the Engineering project, I decided to make an elastic-powered car with a 3-millimeter thick wood laser cut with extruding parts to allow for me to apply adhesive to stick the pieces together.

Techniques I will need to master:

One of the major components of my project is the laser-cut body, so I spent a lot of time manually drawing out the lines from scratch to cut and to ensure that the parts are cut at the same length in order to fit in together. I decided to use Adobe Illustrator to design the body of the car due to me being somewhat familiar with the software. If help is needed with the laser-cutting portion of the car, I can search online and consult one of the design facilitators on laser-cutting.

After all the parts are laser cut, I will need to stick the wood pieces together. I plan on using wood glue, which works well with flat, 90 degree corners in a staggered pattern (see sketch and adobe illustrator picture). I have used wood glue in the past during Grade 8 Product Design to stick together a laser-cut box, therefore I feel that I should be able to use wood glue effectively. If I do run into trouble using wood glue, I can consult the design facilitators and they can give me advice on the usage and application of wood glue.

I will also need to use hot glue in order to apply the dowels/columns that hold the rubber bands in place, which I can do by practicing using the hot glue gun or with help from my colleagues. Previously in Grade 8 Product Design, I have used hot glue therefore I feel that I will be able to accomplish using hot glue in my project.

The laser-cutting template as seen on Adobe Illustrator. Text included is for measurement reference.

Materials needed:

  • Skewers to act as axles (Confirmed)
  • Straws to hold axles (Confirmed)
  • 3mm Plywood for the body of car (To be confirmed)
  • Laser-cutting machine to cut wood (Confirmed, need to send parts in advance)
  • Wood glue (Confirmed)
  • Hot glue (Confirmed)

Timeline:

Lesson 1: Inquire into materials, start designing laser-print template

Lesson 2: Finish laser-print template, start laser-cutting

Lesson 3: Finish 1st prototype, re-print parts (if needed), ask for feedback

Lesson 4: Start final product assembly

Lesson 5: Finish final product, test product


Reading Reflection #3

Since my last reflection, I have read The Time Machine by H.G. Wells. I think this novel is somewhat complicated to take in and understand, but the story is very interesting and intriguing to me. Despite the seemingly short length of the novel, it revolves around a single individual and his adventure into the future. I would only recommend this book to people that are enthusiastic and focused on reading, because the vocabulary used in this novel is similar to those used in the 1800s, requiring some effort and searching in order to get the full meaning of the book.

I’ve just finished The Time Machine and a lot has happened since the start of the book. The novel itself is about the adventure of a time traveler told from his own perspective after exploring the future a few thousand years from now, where the time traveler has to find his time machine which was hidden by the beings of the future to prevent from being stuck in the primitive future. In my opinion, the text is quite engaging, since the elements of fiction the author chooses in the novel allowed me to fully understand the abstract objects within the story by describing the objects using smilies and metaphors.

I’m currently considering using the novel Death’s End by Liu Cixin to use for my independent essay. Although this book is a very long read, I believe that I am more familiar with the cultural and literary content of the book compared to my other reads this year. I think that my chosen text uses various literary techniques to describe and convey a purpose as similarly seen in many science fiction novels, allowing for me to better and more easily analyze the choices made by the author. My current intention is to focus on how Cixin uses literary techniques within his book to convey a theme and the author’s tone towards the universe and human development. Cixin uses the elements of fiction in his novel to allow the reader to better understand the text by describing artificial and abstract items and also to understand the development of the plot and sequence of events in the story.

I am not very concerned with the independent literary essay, but I am somewhat concerned about how we will be assessed in the literary analysis essay and whether the strands assessed will be the same as before or if there will be differences from the past essay assignments.

Engineering Project Blogpost #1

So far, I wanted to make some sort of contraption or toy that can allow younger kids to learn and understand energy transfer. I had difficulty coming up with some ideas, but here are some of them:

My first idea is basically a windmill that is spun by the cranking of a handle. Here is a diagram of something similar to my idea that I’ve found online:

Model of a windmill similar to what I envisioned with a handle to crank the windmill

Some pros of this design are that the design may not be as difficult but would require woodwork and that the design effectively shows the energy transfer from the cranking of the handle to wind energy from the movement of the rotors. A con of this idea is that this idea may be too simple and easy to make.


Another idea I have is somewhat the inverse of this idea, where via a source of wind energy, rotors on a windmill are spun and possibly some contraption that moves and as a result of the spinning of the handle links to the contraption, leading to the contraption making some movement as well.

Instead of having a person cranking the handle of this contraption I made in Grade 6, perhaps I could attach it to the handle portion of the windmill above and use wind power to move a similar contraption.

Some pros of this idea are that this is a variation upon the idea of the crank windmill and this makes it a bit more advanced than the previous idea, which may be beneficial and not as beneficial. This idea is also good to show how the energy transfers from wind energy to kinetic energy from the movement. Some cons of this idea are that this idea may take more time to build and that this idea may not be the most original.

Some other ideas I have that I have not explored as much is the option of making some sort of toy that relies on elastic energy that converts to create elastic energy, such as a toy car that will drive forwards after being pulled back.

Socratic Seminar Reflection

A few weeks ago, I participated in a formative Socratic Seminar about The Absolutely True Diary of a Part-Time Indian. In the Socratic Seminar, I participated in a conversation regarding the usage of literary techniques within the novel by Sherman Alexie and discussed why the author has decided to employ these techniques.

In the Socratic Seminar, I believed I did well working collaboratively with group members and contributing my thoughts and opinions regarding the usage of literary techniques. I did well on building on the group’s thoughts and, at the same time, elaborated and expressed my own ideas in regards to the techniques.

I think I could work on my usage of technical vocabulary. Although my group has analyzed the author’s choices, we did not reference specific vocabulary on literary techniques. In addition, I can improve more on my analysis of the choices of the author, voicing my own thoughts and asking others why the author decided to use certain literary techniques at certain parts of the novel.

For the next Socratic Seminar, I plan to reference more technical vocabulary regarding literary techniques to improve my contributions to the group. In addition, another goal of mine for the next Socratic Seminar is to voice more of my analysis of techniques since I could have analyzed the usage of the techniques more.

One of the steps I will take to achieve these goals is to take more notes regarding where techniques are used and study the various technique terminology more to understand what techniques my group members may be referencing. I will also analyze more of the quotations that I have put out. This way, I can contribute more to the group discussion and help the group understand the use of techniques in The Absolutely True Diary of a Part-Time Indian more thoroughly.

Reading Reflection #2

I have recently finished the novel that I have been reading, “Death’s End.” Since my last reflection, there was a lot of development and eventually resulted in the protagonist and another character, left alone to enjoy the rest of their lives in a virtual, 1x1km world that can be changed to their preference.

My overall impression of the novel is that it is a unique and intriguing read. There may be sudden shifts in plot and sudden changes in the future of human civilization, which I think the author attempted to use to convey a meaning. The novel starts from a utopia between 2 civilizations sharing knowledge into a realization that the entire universe is dependent on survival-of-the-fittest mentality, or according to the book, like a “dark forest.”

I noticed that the author tends to use a lot of imagery, metaphors, and similes to convey an abstract theme, comparing it to current-day objects while providing a sense of uncertainty. An example is where the author describes an interstellar weapon as a “paper slip” (Liu, 587) and where a spaceship getting sucked into a 2-dimensional world is like “ice creamed dropped onto every direction” (587).


Reading Reflection #1

A book I’ve been reading lately is Death’s End by Cixin Liu, the third book in the three-body trilogy. This science fiction was originally published in Chinese and was translated into English by Ken Liu.

This novel is based on earth in the future, where the existence of another civilization known as the Trisolarans was discovered. The Trisolaran solar system consists of 3 suns and therefore means that there is constantly a threat of civilization eradication in the Trisolaran solar system.

Many sections in the novel are deeply linked to me because they take place in a futuristic Beijing, where the entirety of the city was embedded underground for protection against Trisolaran invasion. In addition, the protagonists of the series are people that have a Chinese background, allowing me to understand the Chinese influence behind the protagonists.

This novel made me realize that our current society isn’t fully developed and that we currently do not have a lot of technology in the universe we are in. It is possible that there are many civilizations in the universe but we have not discovered any others due to a lack of technology. In addition, this also showed to me that in times of crises the world can combine together and work together against a common cause.