ABSTRACTION: Blog #4

What are Formal Elements in photography?

  • Formal elements can be defined as the visual devices and components a photographer can manipulate to convey meaning and make their pictures more interesting. Formal elements of photography include lines, shapes, patterns, texture, tone, and focus.

Lines:

Using Lines to Improve Photographic Composition - The Photo Argus

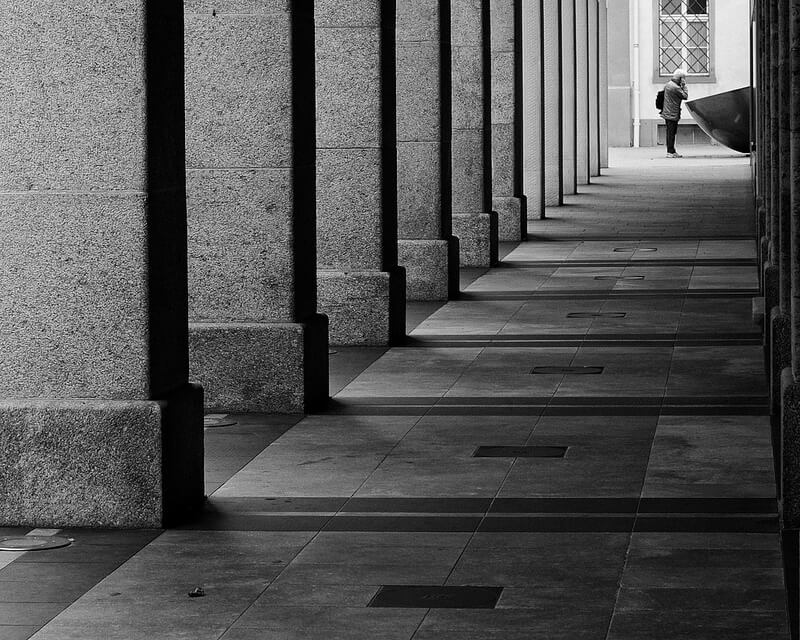
Manuel Buetti – Arcade Chur

In this picture, the photographer utilizes lines formed from shadows from the pillars, the outline of the hallway, and the tiles of the floor, to lead the audience’s eyes to the subject which is the person at the end of the hallway. The lines also create energy of movement, that reaches from the start to the end of the hallway.

Shape:

Shape & Form

http://photodomain.com.au/photography/shape-and-form/

In this picture, the photographer captures the shapes created by the shadows and the shape of the building. Most of the shapes that compose this picture are sharp and defined, like rectangles triangles, and squares. With the lack of curves and round shapes, it creates a sense of order and preciseness.
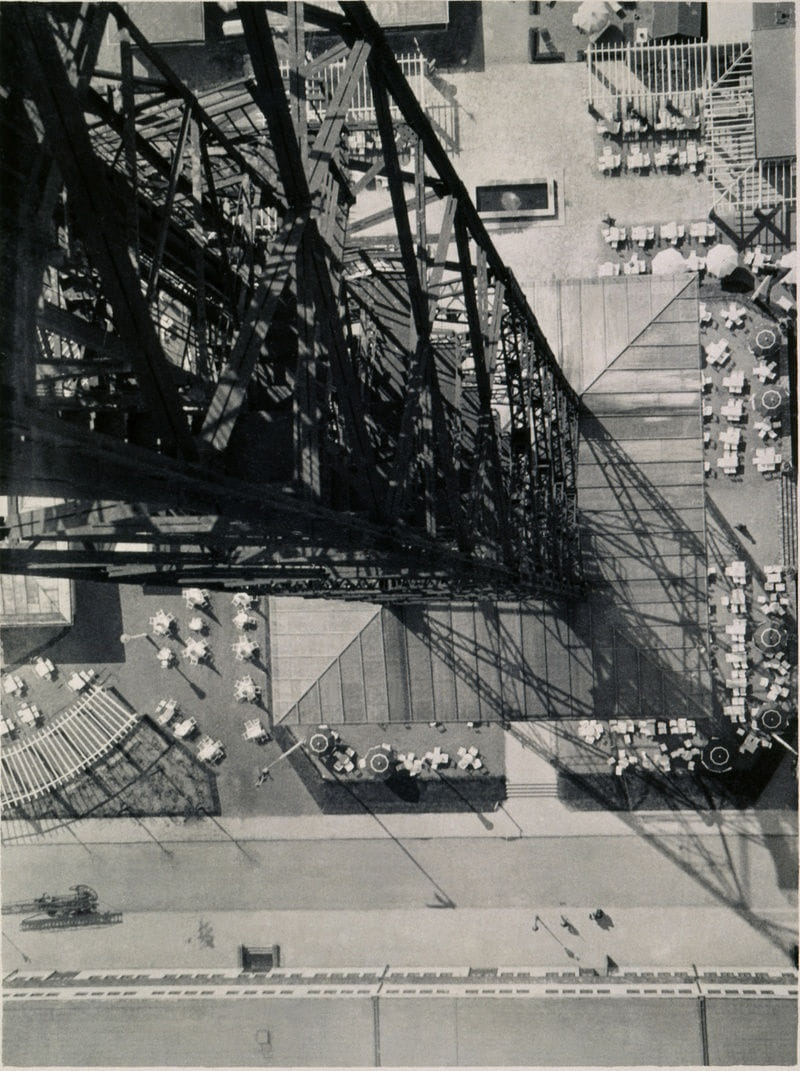
Patterns:

Weekly Photography Challenge – Patterns

Kate Ausburn

In this picture, the photographer captures the pattern created by the windows on the side of a building. The picture repeats the shape rectangular shape and lines of the windows, the placement of the windows, and the reflection in the windows also repeats. The picture is taken at a diagonal angle which makes the patterns pop out to the audience more and creates more dynamic and a sense of flow and rhythm.
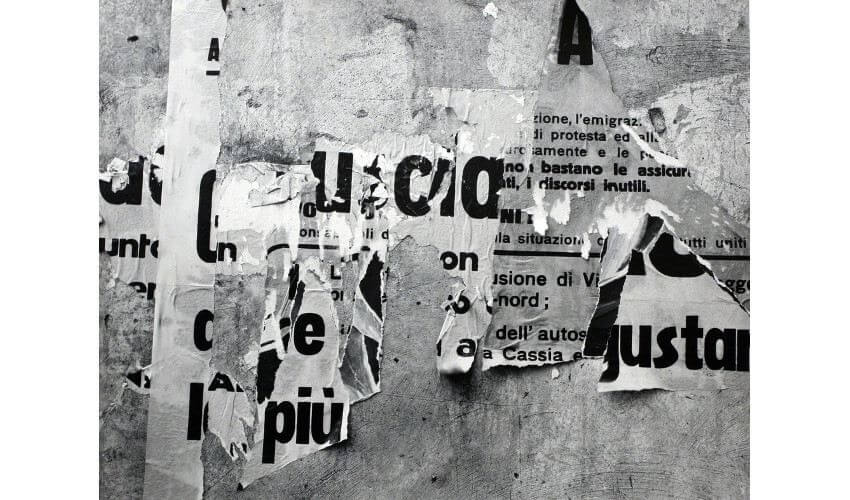
Texture:

Rome 55, Aaron Siskind | Mia

Rome 55, 1963 – Aaron Siskind

In this picture, the photographer captures the texture of a gelatin silver print. The photographer captures the subject with sharp focus and with lots of details.

Value/Tone:

Seascapes' timelessness by Hiroshi Sugimoto — Cercle

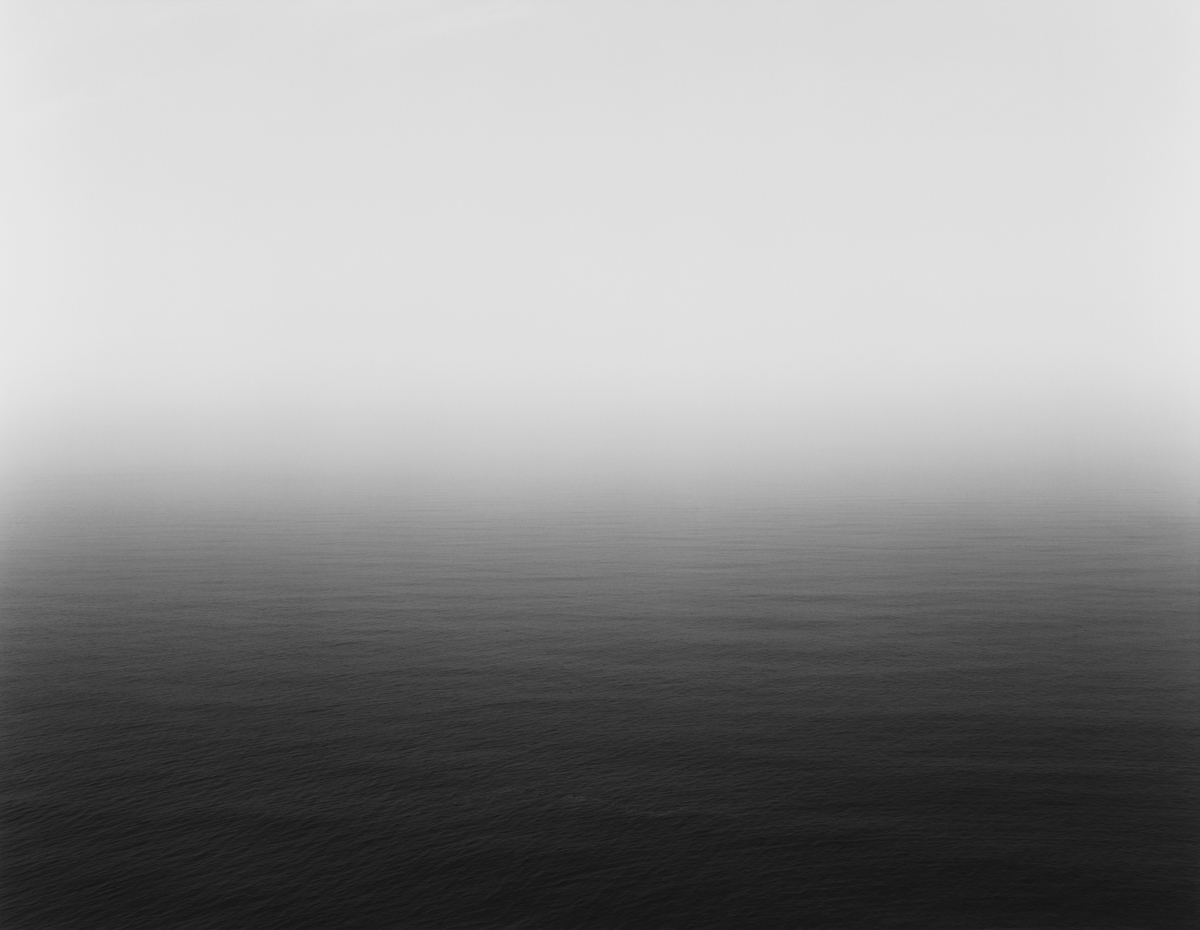
Hiroshi Sugimoto: Seascapes

In this picture, the photographer photographs the horizon of the seascape. With only black and white colors, the brightest tone is the sky that gradients its way to the sea which is the darkest tone of the picture.

Focus

Field #20', Uta Barth, 1997 | Tate

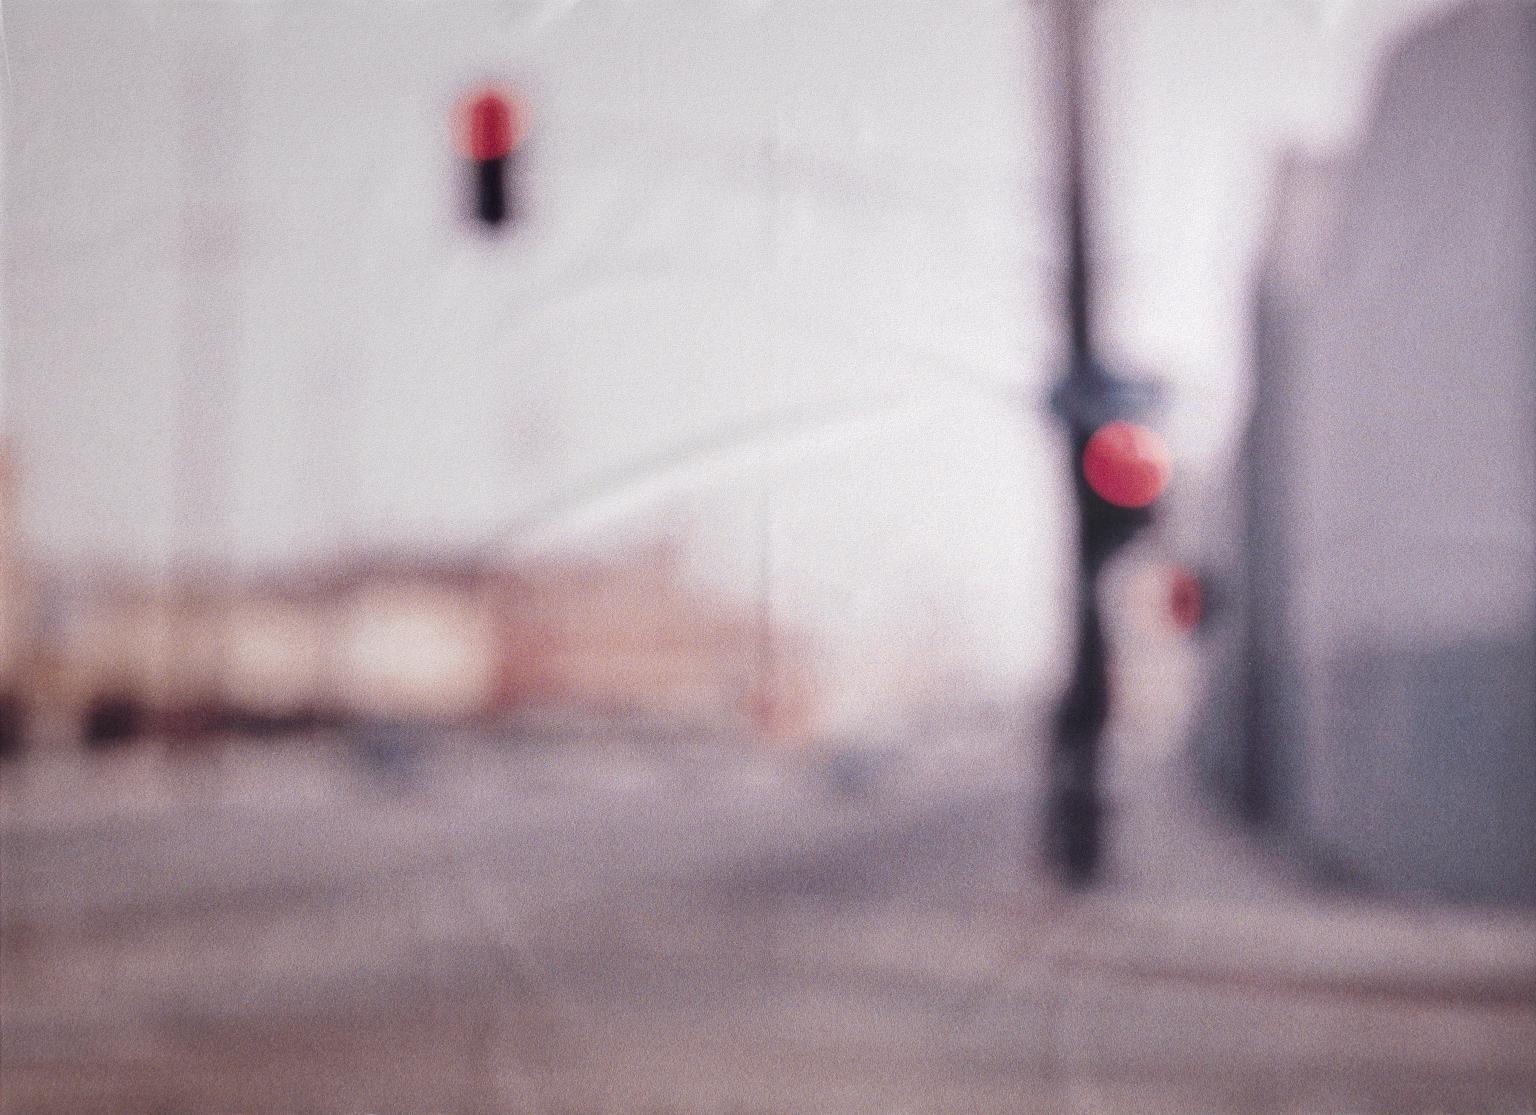
Field #20′, Uta Barth, 1997 | Tate

In this picture, the photographer blurs the image to capture unique colors, undefined shapes, and interesting silhouettes. Nothing is in focus. The blurred street brings out a sense of “ineptitude”.

Can an image show just one element at a time?

Yes, but then you would have to be very intent when it comes to trying to create that photo, and when you are at that point I would argue if your photos actually represent abstract photography or not.

It is definitely possible, but in most photos, it’s usually going to include more than 1 element. Because all these elements are intertwined in similarities. You can’t have shapes without lines. You can’t have texture without focus, and the same goes for patterns. Every element is connected to one another.

ABSTACTION: Blog #3

What was the Pictorialism movement in photography?

  • The pictorialism movement is the movement in which the aspects of photography are manipulated to make the photograph more aesthetic which resembles paintings and drawings. It places aesthetics beauty and expressiveness above an accurate capture of the scene.

Henry Peach Robinson: Fading Away (1858)

In this picture

What was the straight photography movement in photography? Why was it popular amongst photographers?

  • Straight photography movement is the movement in which photographs are meant to depict the scene with sharp focus and detail. It highlights the visual language of the camera itself, such as shape, tonality, contrast, and focus.

László Moholy-Nagy: Funkturm Berlin (Berlin Radio Tower) (1928-29)

How have Edward Weston and Aaron Siskind (above) been influenced by the Straight Photography Movement?

Edward Weston: Looking at his work, it is apparent that his early work definitely deviated more toward Pictorialism, you can see that his photographs are more similar to paintings and are not focused on bringing an accurate depiction of reality. Edward Weston Photographs - Early Years — Weston Photography: Four  Generations of Photographic Excellence

His later works are more influenced by Straight Photography, which is centered around capturing the scene the way it is real and raw.

Edward Weston Photography Analysis — Weston Photography: Four Generations  of Photographic Excellence

Aaron Siskind: He is influenced mostly by Straight Photography, through his photographs, he captures subjects with great detail and focus.

Aaron Siskind as City Documentarian - The New York TimesHow Aaron Siskind Found Abstraction on the Streets | Ideelart


What makes the work of contemporary photographers Andreas Gursky and Uta Barth abstract? Can they be classified as pictorialist or straight photographers? Explain your response.

  • Andreas Gursky and Uta Barth‘s work are all abstract because through their work, they extract meaning from their subjects that they want to communicate to the audience.
  • Andreas Gursky can be classified more as a Straight Photographer because his style is more of capturing shapes and details and contrast of his scenes, like this picture here:

Andreas Gursky retrospective opens at Hayward Gallery | CNN

Uta Barth can be classified more as a Pictorialist Photographer because her work is more centered on highlighting aesthetics of her photos by manipulating the picture itself or the camera. She uses blurriness in her work a lot, an example:

Uta Barth: Recent Photographs - The Polygon Gallery

ABSTRACTION:Blog #2

My own definition of abstract photography:

  • Abstract Photography is representational. It uses subjects that can be by themselves, in patterns, or be used in any possible way in a photo that can be interpreted to mean something. That process of interpretation is the “extraction” of meaning through the subjects that is a vessel that holds meaning by itself, as a group, distorted, blurry, zoomed in, zoomed out, over or under-exposed, etc.

WRONG! Photography Context

Can you take a wrong picture?

  • I believe that you can’t take a “wrong” picture because there is no choice made by the photographer that can be considered as wrong, in terms of photography, right or wrong is subjective, even though if a choice leads to the breaking of a “photography rule”, it does not mean that picture is wrong, I would argue that the so-called “rules” of photography should be considered more as “suggestions”. On the other hand, breaking photography rules is beneficial because it open doors to new unique visuals that might look even better.

How is context important in Photography? Reference the picture above in your answer. Does the word “Wrong” make a difference? Why?

  • Context does matter in photography because context gives validity to rule-breaking choices. You need context so your audience would know that you broke traditional guidelines for the purpose of having a better end result of a photo. Like how John Baldessari provided his audience with context through the word “WRONG”. The word justifies John Baldessari’s choices in this picture. The word tells the audience that the photo was taken purposefully “bad” for the purpose of his artistic expression. John Baldessari wants to express his mockery of how people are conforming to the rules of photography and considering photos that break rules as incorrect or bad.

Science unit: Engineering Design Project blog post #4 – REFLECT & SHARE

Kai Geng and I, we first were leaning towards the idea of energy transformation including potential energy to kinetic energy, we first grappled with the idea of a rubber band car, then we played around with the idea of a hopper popper, but the material need to make the hopper popper was unavailable. We then came across a video called “How to Make a Rubber Band Plane Out of Paper – Very EASY” uploaded by JoshBuilds on youtube. We were fascinated by that idea and we decided to take Josh’s single-propeller design and make our own, double-propeller rubber band plane. We looked at materials that are recyclable, and accessible, and we made sure the design was easy to build. unfortunately, I got sick during the final stages of construction. We ended up not being able to finish the prototype. After receiving peer feedback, some strengths we came up with our design were that it was very easy to make, the materials were recyclable and accessible and our design aligned with the needs of our targetted audience, which is children. These children can gather these materials themselves, they can construct their own plane, and get educated on energy transformation. lastly, our design is very safe to use. Some weaknesses of our design were that it was fragile, the quality of the materials wasn’t very good, and we didn’t get to finish it.
Our design fits into the design specifications because it acts as a toy that aligns with our targetted audience which is children, second, it is environmentally friendly, and all the materials that are needed to construct this plane are recyclable. Our design arguably doesn’t possess the best durability, but considering that the materials can be bought so cheaply and so easily, to some extent it cancels out the durability issues we have with our plane. It is for sure very safe to use our plane, its materials are harmless and construction doesn’t require any dangerous jobs like carpentry, laser cutting and such. Our design is original because we admit we took heavy inspiration from JoshBuilds’ video, but instead of completely copying his design. We innovated his design by adding one more propeller and we modified the rubberband twisting mechanism.
I am most proud of the cooperation Kai Geng and I had. We both inputted an equal amount of work, and no one was slacking off. We helped each other out when one is struggling. We were patient with each other. Most importantly, we built on top of each other’s ideas very well. The most challenging thing during this unit was probably when I get sick, and Kai had to work on the project alone, it was very challenging for the group, thank you Kai very much for putting in extra effort.

Science unit: Engineering Design Project blog post #3 – CREATE & IMPROVE

Reflecting on our prototype, one of our strengths was that we used very recyclable materials to construct this plane, and it wasn’t very complicated to do so. Some refining that would be needed for our prototype is first to finish it, second is to find better ways to glue pieces together because at the moment the wings are fragile. The feedback received from peers is generally these: finish the prototype, fragile, cool concept. with this feedback, one of the things we are going to change is the durability of the plane for it is very fragile right now. And most importantly we will try to finish our prototype.

Science unit: Engineering Design Project blog post #2 – DEVELOP & PLAN

Because my partner and I decided early on that we were going to design a product that serves as a toy for children, we chose to make a plane because our toy will entertain the children and at the same time, teach them about energy transformation. and we tried to make it look as “cool” as possible, so we designed the wings purposefully into that shape, to mimic a battle plane. Our plane is made out of paper straws, paper pins, rubber bands, and foam, all recyclable materials, although foam isn’t considered to be the most recyclable material. Our plane wouldn’t be the most durable toy to play around with, but we believe the accessibility of the material and how easy it takes to construct the plane would out weight the problems of durability. Our plane is very safe to play with, it takes some extra attention when building the plane when you are dealing with hot glue and super glue, but overall it is very safe. Our plane was inspired by a video published by the youtube channel JoshBuilds titled “How to Make a Rubber Band Plane Out of Paper – Very EASY”. We were heavily inspired by that video, we took their design of twisting the propellers that were linked to rubber bands so that releasing the propellers would create the rotation that would help the plane fly. Our innovation was that we took that mechanism and decided to add two propellers to our plane instead of one which was the same as JoshBuilds’ design.

Here is the plan to construct this design.

1, gather materials needed: foam boards, 2 straws, 3 paper clips, 1 plastic cup, 2 toothpicks, 4 rubberbands, super glue, and hot glue.

2, cut the foam board into the wings, and the tails of the plane according to the measurements given.

3, hot glue the wings and tails to a straw according to the plan

4, grab the other straw and cut out three 1cm straws

5, cut the plastic cut vertically, making it into a fan shape, you then lay it flat and cut out 4 propellers.

6, you superglue the propellers to the toothpicks, two propellers per toothpick, the tips of the toothpicks should be glued to the bottom of the propellers.

7, bend the paper clips into small hooks.

8, hot glue the paper clip hooks to the middle toothpick part of the propellers, when the propellers and horizontal, the paper clip hooks should be verticle, glued to the middle of the propeller right on the middle toothpick part.

9, connect 2 rubber bands together, do that 2 times to create two rubberband ropes.

10, hook the ropes to the hooks of the propeller, take the three 1cm straws we cut out earlier and stick two of them under the right & left wings, and stick the last one at the bottom of the tail of the plane.

11. have the rubberband rope connected to the propellers go through the straw holes under the wings first, then let it both go through the straw hole under the tail of the plane, when it goes through, hook both the rubberband ropes to a paper clip, it will stop the rubberband ropes from trying to retract back towards the propellers. seal the paper clip and hot glue it so it doesn’t move.

12, completed.


Engineering Design Project Planning

What is the purpose of your device/toy, how does it function, and who is your user?

My elastic band plane’s purpose is to transfer stored energy into kinetic energy. The plane stretches a rubber band which when released will push the plane into the air. My intended audience is primarily children who will learn the concept of energy transformation through the usage of this toy

What is the environmental impact of your product and is it durable and safe?

My product uses very accessible materials such as rubber bands, straws, paper clips, and paper. All these materials can be easily recycled, and they are very safe to manipulate. It’s reasonably durable considering its materials and performance which is promising.

What precedents inspired you? What did you take away from them & how did it inform your choices?

Kai and I took inspiration from the video “How to Make a Rubber Band Plane Out of Paper – Very EASY”. Uploaded by the youtube JoshBuilds. We were inspired by his design of twisting the rubber band and releasing it to provide rotation to the propellers. We plan to use his single propeller to make our own double-propeller design.

How are you making your product original and/ or using creativity?

We are going to make our own double-propeller rubber band plane inspired by JoshBuild’s design. We are going to use different materials.

ISB Backstage Tour: Spaces and Places

This is the thrust stage, it’s located in the ES theater. This is a type of stage that extends into the audience, the audience can sit on 3 sides of the stage. The purpose of this thrust stage is that it can bring a more immersive experience to the audiences. This thrust stage can also be used for many other purposes like a fashion show etc. This connects to the backstage world of theater because actors stand on it.

This is the tech booth, which is located in the ES theater. its equipment can control the audio, music, and lighting that is displayed on stage, usually, 1 – 2 people will sit in this tech booth during rehearsals and performances. They will listen to ques from both the actors and the stage manager and control the light and sound accordingly.

This is the spotlight, it is located at the top of the HS theater. its purpose is to provide a strong and tracking light to actors or subjects. How the spotlight is incorporated into theater is first, the stage manager will queue the person handling the spotlight. Then the handler will remove the iron sheet that blocks the light beam, and position the light onto the required subject/space.

This is a retractable audience, it is located on both sides of the ES theater. It’s purpose is to provide more seats for more audience members and collaborating with the thrust stage that allows the audience to sit on 3 sides of a stage.

This is a stage light. It is located on the top of the HS theater. It’s purpose is to provide light for actors and audiences, create atmosphere, setting tones, adding depth to the story that is performed on stage. How this incorporates into the world of theater backstage is that the stage manager will queue the tech-booth to change the lighting on stage. The tech booth then will press some buttons, flick some levers, and the lights on the stage will change.

Skip to toolbar