g9 engineering project – reflect and share

MY TAKEAWAYS AND REFLECTION

what impact did your initial problem analysis have on your planning? 

To begin with, acknowledging my time and resource constraints allowed me to formulate a timeline that would keep my work organized. Knowing the time limit offered influenced me to distribute an equal amount of work to be done in each class, allowing me to complete the project on time, with quality.  

Prior considerations of manufacturing problems also helped me carefully think through the materials and procedures I would take in order to enhance the quality of the product. For example, I took into account of the materials I would use. Therefore, I had them ready prior to my practical manufacturing classes to ensure that everything flows out smoothly. I have also watched through tutorials at first to be certain that I am equipped with all the skills needed to build the device.  

What am I proud of?  

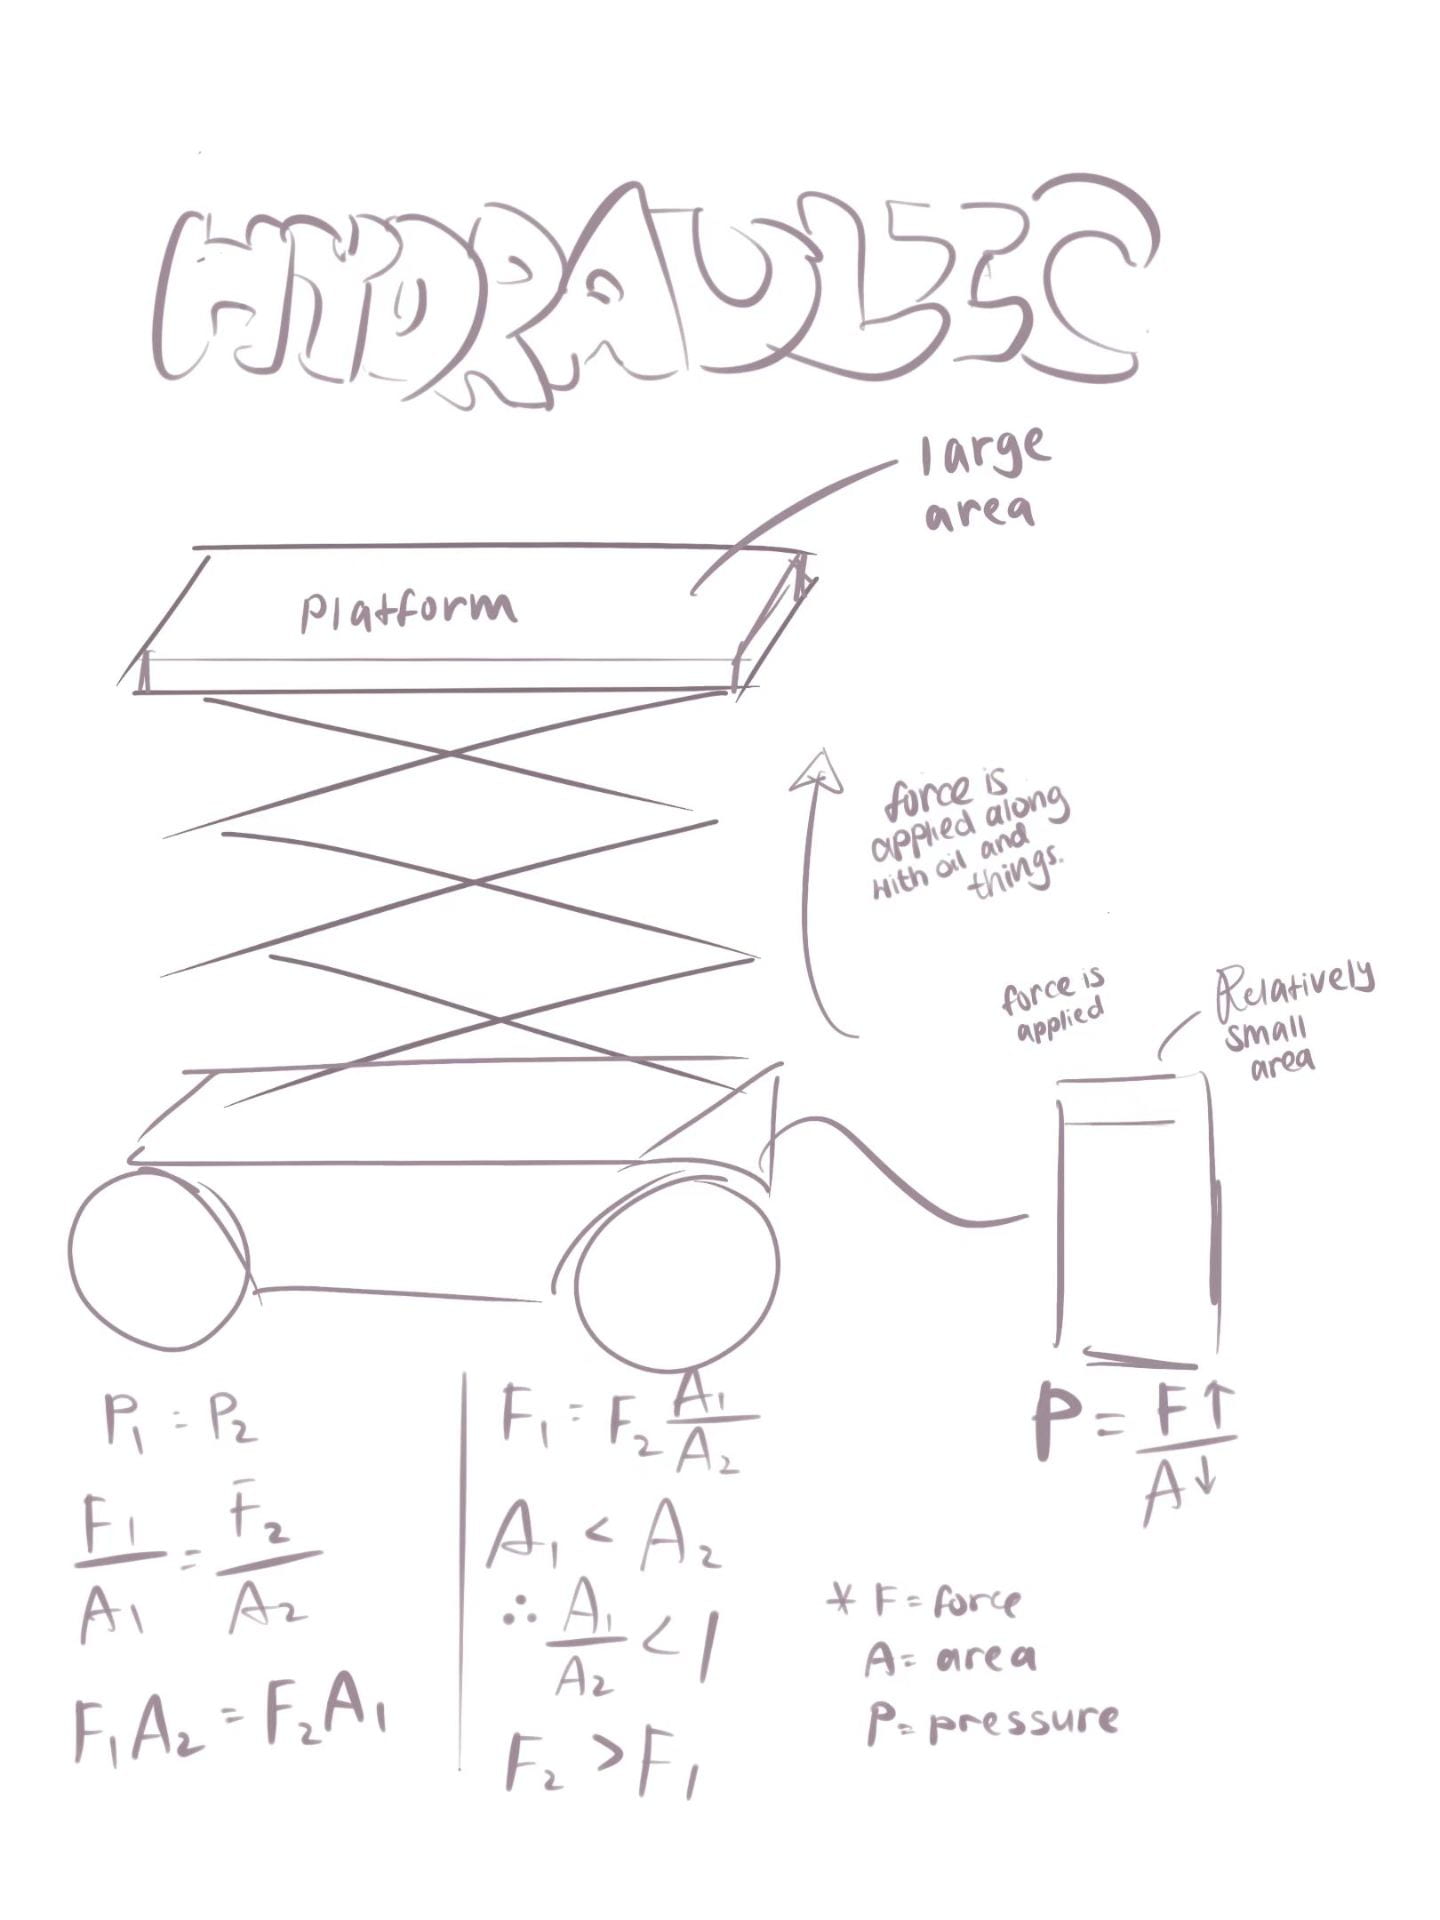
This project is completely self-based, and is the first individual engineering project we’ve had. I’m grateful that I have completed the project by conducting my own research, making the device, and performing trials. I’m also glad that I have reached my success criterias, showing the energy transfer of hydraulic energy to mechanical energy. The lift is able to operate like expected, and I have completed the project on time.  

 What could I have done differently if I was given more time? 

There were many flaws in my final project, including mis-drilled holes and areas I missed out on gluing. These steps weren’t major issues, but refining them would improve the overall quality of the scissor lift. For example, as shown in my final video, one of the corner wasn’t even tangible. This was because I overestimated and did not carefully plan out where to drill the holes. I drilled by using my vague perception, causing a lot of the sticks to be unequal, creating an imbalance in the final product. This imbalance of sticks made the lift slightly slanted, which affected the objects it could carry. If I had put more effort into contemplating about small details like this, it would improve both the appearance and practical use of my device.  

 Would have my alternative choices worked better? 

I genuinely believe my choice of creating a hydraulic lift was a success, and my alternatives wouldn’t have been a replacement for this project. I had lots of fun throughout the creation process, and learning about hydraulic force was also interesting. The wind turbine and the lamp would have both required more knowledge associated with electrical circuits, which would be difficult to learn. I believe the alternative ideas would utilize more time, and especially since I was absent for a class, the hydraulic lift was an appropriate project to complete over the course of the two weeks. 

Overall, I believe my ‘Hydraulic Lift’ had achieved the goal of this unit; I attained the goal I have set prior to this project, which is for the device to satisfy the needs of energy capture & storage. I especially enjoyed the process and had lots of fun. It enhanced my knowledge on energy transfer and also allowed me to practice more on-hand skills that prepares me for future projects.  

G9 Engineering Project – Create and Improve

February 21st: Today, I gathered up the materials and started drilling. It wasn’t a laborious task since I only did drilling and attached the tacks in. There were no special skill requirements; I experienced this in our previous bridge-building project.   

However, I encountered one problem that delayed my progress. I realized the nails did not fit into the holes and needed to be enlarged. Therefore, I had to re-drill each hole again to ensure that the nails would fit. This process took up a lot of my class time, so I spent most of the first class on drilling and finding the right fit of the holes. 

February 23rd: Initially, I was going to continue with my plan formulated in the Develop and Plan section. However, I encountered a problem that would significantly affect my final product. As you can see in the image below, the holes I initially drilled pierced through the sticks, resulting in cracks and crevices throughout. This problem would damage the final product because it would make the lift fragile, destroying this device’s purpose 

There were no alternatives other than re-drilling the holes and replacing the popsicle sticks. I realized the cracks were made because I drilled slanted or if I added too much pressure. Thus, I avoided these problems when re-drilling, but this process also took up much time.   

I could follow my plan in this class and continue with the procedures. After drilling, I interconnected the two sets of sticks by using four thin, cylindrical sticks. Liza recommended that I could use a pencil sharpener to sharpen the ends of the sticks to help attach them better, which was feasible: 

This process required me to be precise about the length of each stick so that the lift was evenly balanced and aligned.   

Additionally, I spent today’s class trying to attach some of the fundamental pieces to a soft, thin wooden plank. Initially, things went out smoothly until I realized a mistake I had made. Instead of just sticking on one side of the stick, I applied hot glue on both, which interfered with the movement of the lift.   

I had to remove the glue from the other side of the block so that the lift is flexible. Similarly, because of my mistake with the bottom attachment, I knew the top of the lift had to be stuck onto using the same method. Therefore, I applied hot glue to the alternating side of the bottom attachment, which created a balance and allowed the lift to be adjustable.  

February 27th: This was my last day to work on the project, and I did rush a little, leading to some things that could have been improved in my final product. I followed my initial plan of attaching the syringes, which I thought would be uncomplicated; However, I attempted many trials, which helped me attain the device’s purpose.   

As you can see, I have identified the problem causing my failures. Mr. Walton gave me some tips and suggested that I hot glue the smaller syringe onto the wooden board to stay in place. I followed the instructions and had success! Below is my final video There were other adjustments that I should make, but due to time constraints, they were beyond the bounds of possibility. I realized that the holes I drilled were still unaligned, causing one edge of the lift to be uneven. Consequently, this resulted in a limit on the lift’s objects. Heavier ones placed would probably break the lift due to its imbalance, but I still followed most of my planned procedures, which resulted in this final product.

There were other adjustments that I should make, but due to time constraints, they were beyond the bounds of possibility. I realized that the holes I drilled were still unaligned, causing one edge of the lift to be uneven. Consequently, this resulted in a limit on the lift’s objects. Heavier ones placed would probably break the lift due to its imbalance, but I still followed most of my planned procedures, which resulted in this final product. 

G9 Engineering Project – Define and Inquire

Define the problem

In this project, we are required to manufacture a product that demonstrates any sort of energy transfer. The product must be functional, respond to a clear purpose, and it should be original, durable, and safe. We should have an intended audience, and our product should suit the satisfaction of our audience.

Safety considerations:

  • Be cautious with all tools and materials
  • Avoid having contact with others to evade harming others
  • Be careful with any use of electricity and heat

Potential Manufacturing Problems:

  • What kinds of materials are needed
  • Quantity of material
  • use of different tools and equipment
  • Manufacture procedures

Constraints:

  • Time: Maximum two weeks to complete the project
  • Resources: Only a limited amount of material is provided to us. There is also a limited option.
  • skills: there may be involved techniques that I am unable to perform while manufacturing.

Precedents:

Wind turbine that generates light How to make working model of a wind turbine from cardboard I Very Easy

Brief Explanation: This product’s intention is to use a wind turbine and use the potential energy of wind and transfer it to light and thermal energy. As the windmill spins, it generates energy that would light up a lamp or any other ornament. It would require materials of cardboard, lightbulb, and a cable. This prototype idea possibly achieves the purpose of adorning and decorating, however, I don’t recognize a practical use of it, since turning wind directly to light is still infrequent in the highly industrialized world. I believe it would be engrossing to explore the mechanism of energy transfer of a commonly used device in real life.

Mini hydraulic lift. Lifting hydraulic power Test with syringe

Brief Explanation: Any hydraulic device converts hydraulic energy to mechanical energy, consisting of kinetic, electrical, and so on. In this device, a manually operated step is used first, and then the hydraulic energy transferred from the syringe transfers into kinetic energy and lifts the “lift”. This device is used to carry objects and lift them vertically without direct contact. This would require materials of a syringe, cardboard, and nodes (nails and clips).

Lamp Energy Transfer and Efficiency | GCSE Physics | Doodle Science

Brief Explanation: The function of a lamp is coherent, the use generating light. A lamp has a simple mechanism, electrical energy is the input, and heat energy and light energy are the outputs. The video shows the operation of how a energy transfers into light energy. Although the lamp accomplishes my inclination of making a practical device, it still has drawbacks that will hamper my work progress. Making a lamp would be simple, but the involved knowledge and skill required for this device is to acquire knowledge of electrical circuits.

As a result, I have chosen to use the mini hydraulic lift for my engineering project, because it is unique and displays a comprehensible understanding of energy transfer. This device seems like a feasible one to make throughout the two weeks provided, and it doesn’t require too much additional knowledge. For example, the alternative idea of making a lamp requires a somewhat adequate knowledge of circuits, but I don’t possess that ability, so I eliminated that idea. What really stands out to me about the hydraulic lift is that there are many benefits of this device, the mechanism of lifting using a non-direct contact is interesting, and an immense scale of this device is used in everyday lives.

Audience: The audience of this device is open to the public; it is applicable for anyone and can be helpful for a variety of purposes. The intended purpose of this device is to carry small objects, and to fulfill the requirements of our science project. Therefore, this device could also be targeted to anyone who is interested in learning about energy transfer.

The problems or needs for this device possibly satisfies the needs of energy capture & storage. This device does not necessarily consist of the use of electricity, so it would be both environmental friendly and can also the ones who have limited access to electricity. Although the artifact I will be making won’t be appropriate for daily uses, a larger scale of the same device and mechanism would be beneficial.

Mechanism:

Prototype  Real life example: