
Blog Post 3: Researching the Starting Point
When cameras were first invented in the 1830s, it was used purely for scientific and representative purposes. In the 1850s, advocates such as William John Newton suggested that photography can be artistic.
The Pictorialism movement happened around the 19th century and strived for photography to be recognized by artistic institutions and elevate photography to the same level as paintings. Pictorialists valued the visual appeal of their photos above producing accurate visual representations.
The Straight photography movement in the 20th century was the rise of a new style of photography. Straight photography emphasizes photographing scenes in detail, while also capturing abstract forms. The sharp focus and detail of Straight photographs distinguish them from paintings.
One of the reasons the Straight photography movement was popular at the time was because it had a similar purpose to the Pictorialism movement before it. Both movements wanted to distinguish photography from paintings and elevate photography to higher levels.
Albert Renger-Patzsch


Albert Renger-Patzsch’s photographs were definitely impacted by the Straight photography movement. This is especially noticeable in the picture on the right. Renger manages to include both sharp focus, detail, and abstract forms in his photography. His works are very distinguished from paintings, Renger is a Straight photographer.
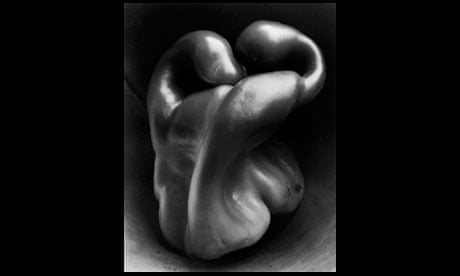
Edward Weston
.jpg!PinterestSmall.jpg "Shell - Edward Weston")
Edward Weston’s photos are very representative of Straight photography. As seen in the picture on the left, Weston focuses on one subject, captures the subject in detail, and includes abstract concepts in his photos. For instance, in the first image, Weston conveys a sense of ambiguity to the audience by photographing this object at a particular angle. The only aspect of Weston’s photography that does not abide by the guidelines of Straight Photography is that some of his works, including the first image here, are not as clearly distinguished from paintings as other Straight Photography. But that could be because of limitations on the camera in his earlier works.
Aaron Siskind

Aaron Siskind was definitely influenced by the Straight Photography Movement. In his works, as shown above, the details are sharp, they provoke thought in the audience, and there is a consistent sense of ambiguity in these images. Though both Straight Photographers, Siskind and Weston do stylistically differ from each other. Siskind seems to specialize in the use of geometric shapes for abstractions, while Weston tilted more toward close-ups and ambiguity.
Andreas Gursky

Andreas Gursky masterfully uses geometric shapes in his abstract photography. Gursky’s utilization of geometric shapes differs from Aaron Siskind’s. The shapes in Siskind’s work do not follow an obvious trend, while Gursky focuses almost solely on buildings with aligned windows or architectural patterns, usually squares. His style is also similar to Straight Photography since his works include sharp details and are very distinguished from paintings. Though his style of photography is similar to Straight Photography, Gursky may not be a straight photographer. The sharp details and abstract ideas in his works may just be part of his unique style and not because he is a Straight Photographer.
Uta Barth

Uta Barth uses blur and manipulating light to create abstract photography. Barth’s works do not allude to the style of Straight Photography as there is little detail nor are they strongly distinguished from paintings. Barth is likely an abstract photographer, but not a Straight Photographer.
Abstract Photos Before & After Editing


We chose these photos without a central theme in mind, but after seeing these pictures together, we found that these three pictures have very interesting connections.
From left to right, the images become more and more blurry. The second image and the first image share traits such as curved + straight composition and visual rule of three. The third image has a similar color scheme to the second.


Blog Post 1,2: Starting Point, Definition
Initial Thoughts:
This unit strongly intrigues me because I was never really exposed to abstract photography before and the 4 images on the DX post seem very interesting and different from my previous understanding of photography.
What do you think is meant by: “Abstract photography can be defined as capturing images in which the subject isn’t the most interesting element.”
From my first impression of abstract photography. I think this statement means that the most interesting element of abstract photography is not what is physically included in the picture, but instead, the thoughts and emotions the picture evokes in the audience.
What I want to know about abstract photography:
- Since abstract is in its name, are there no rules for abstract photography?
- Is there any relation between abstract art and abstract photography?
What I learned from the video:
- It isn’t easy to abstract something
- Abstract techniques have developed rapidly over time: Plane photos were considered abstract in the past because planes were rarer than now.
- Some abstract techniques are blowing things up and utilizing reflections.
Definition of Abstract Photography:
Images in which the subject is not the most interesting element.
WRONG! Contact Sheet


Photography Task 3
What is the purpose of rules in photography?
Following rules in photography generally makes your photos more understandable and visually appealing for the audience. Rules can also introduce new photographers to the basic principles of photography, building a foundation of photography knowledge for them to utilize in more creative ways in the future.
In your mind, what are some of the most important rules in photography?
Focus and light, in my opinion, are the most important rules in photography. Focus is important because it draws the audience’s attention to what the photographer chooses to emphasize. This can strengthen the message the photographer is trying to convey, or just make the photo easier to understand and more appealing to the audience. Focus also often helps the audience develop a stronger impression of the photo since only the most important element (s) are emphasized. Light is important because light is a large determining factor for the mood of photos. Knowing how to manipulate the source and quantity of light gives you much more control over what emotions you want to convey through your photos.
When might it be a good idea to deliberately break the rules?
When an idea or message will be best conveyed without the constraint of a certain rule, if you think your photo will look better not following rules, or if breaking the rules is part of your intent.
Do you think it is possible to break rules if you don’t know they exist?
Yes, rules exist even without we knowing so it is possible to break rules if you don’t know they exist since rules exist without us knowing so. But you won’t know that you were breaking the rules.
Independent Reading Reflection
Books finished:
Emotional Agility by Susan David. This book rationalizes all emotions and encourages us to embrace and accept our negative emotions instead of suppressing them or overthinking them.
Books currently reading:
Greek Myths by Olivia Coolidge. This book consists of many short stories within Greek mythology, both in the mortal and god realm.
Book with the greatest impact on me:
The book Emotional Agility really changed my mindset on how I approached my negative emotions. I used to be extremely pessimistic and feel guilty when I had negative thoughts, a cycle of mental health depreciation, reading this book provided me with a new perspective on these “wrong” emotions I was feeling at the time and made me overall a happier person. I’m grateful for this book.
Book with the most creative language:
The book Greek Myths included the most creative language, the language used in this book has a classic and formal tone, especially the dialogue. Olivia Coolidge wrote character dialogue similarly to dialogue in ancient Greek plays, immersing the reader into the book.
A great example of this would be a conversation between a mortal mother and a son, where the son questions his half-god heritage:
“Give me some proof,” he implored her, “with which I can answer this insult of Epaphos. It is a matter of life and death to me, for if I cannot, I shall die of shame.”
“I swear to you,” replied his mother solemnly, “by the bright orb of the sun itself that you are his son. If I swear falsely, may I never look on the sun again, but die before the next time he mounts the heavens. More than this I cannot do, but you, my child, can go to the eastern palace of Phebus Apollo — it lies not far away — and there speak with the god himself.”
Their style of conversation really intrigues me.
What most surprised you about your books so far:
Emotional Agility:
Drawing randomness aggressively on paper is actually one of the most effective and least costly ways of relieving stress and anger, I would have never thought to try it before reading this book.
Greek Myths:
Almost every god, even married ones, has several mortal offspring apart from their legal families. It does make an interesting story reading how these half-gods either fail miserably in life or eventually become gods, but I did not expect married gods to have so many illegitimate children.
Reflect and Share
Overview of Design Process, share final product, learning:
Final Product:
My final product is a pull-back aircraft carrier that moves by converting elastic potential energy into kinetic energy. (Picture attached), on top of the carrier is a launcher that can be used to launch small paper airplanes forwards, also by converting elastic potential energy into kinetic energy. My final product focuses on displaying the conversion of elastic potential energy into kinetic energy while being a fun toy to interact with.
There is a major deficit in my final product, though. The pull-back elastic bands would periodically break due to the carrier’s large size, and sometimes it would shoot out of the carrier with great force. There was only one kind of elastic band available in the design center, so to improve this product further, I should purchase larger elastic bands to fit the product.
Overview of Design Process:
I have been through three major stages when designing my product. The first stage was brainstorming and research, where I developed ideas about possible toys I could make. I explored many options before choosing my final concept. The second stage was planning the components needed, creating a prototype, and receiving feedback from peers to improve my design. This stage was the stage I spent the most time on since I wanted my creating process to be smooth to leave little room for errors, which needed a specific and accurate plan to happen. The last stage was creating and refining my final product, where I assembled all necessary components with hot glue.
Success Criteria:
Success Criteria:
The final product needs to:
- Clearly display conversion from elastic potential energy to kinetic energy.
- Be mobile.
- Be interactive.
- Not break.
My final product achieves about 80% of my success criteria. It clearly displays conversion from elastic potential energy to kinetic energy, it is mobile, and the wheels are smooth. Users can interact with the slingshot and even create their own airplanes, but the elastic bands for the pull-back mechanic periodically break from strain, which is a significant downfall.
Design Specifications:
Purpose:
A toy that shows energy conversion.
Achievement: The final product visually shows energy conversion through a slingshot and paper airplanes.
User:
Boys and girls ages 10-18, since the toy may be too childish for people over 18 and hazardous to children younger than 10, as there are tiny paper airplanes that can be a swallow hazard.
Achievement: From user feedback of ages 14-15 (about the median of 10-18), the final product is fun, interactive, and appropriate for their age group.
Reflection:
Proud:
I am proud to have created something fun and of considerable size in the design center. I had no experience before this, and it was a great learning opportunity about the design process at ISB.
Challenging:
Developing an idea of measurements was definitely the most challenging part of my design process, as I had no idea what 5 cm or 5 mm were before this project. It greatly impacted my planning speed since I was unsure of measurements.
Using the cutting knife. The cutting knives were a whole new experience for me, and I injured myself on multiple occasions. Cutting cardboard and foamboard was much more challenging than I thought. But with the support of my peers, I learned how to hold a knife properly, and I was able to cut out my components individually.
Create and Improve
Reflect on Prototype:
Strengths:
- Simple, sturdy
- Resembles design well
Refinements:
- Need slingshot stabilization (Slingshot doesn’t function well, bends when pulled)
- Functions too quickly, does not show energy conversions clearly
- Lacks focus
- Masking tape rips off part of the cardboard skin, may need to change the material (Bad aesthetics)
Outline Feedback:
Feedback received:
Anonymous Peer 1:
- Aesthetics need improvement
- The size of the prototype does not fit the axels
- Should change material, cardboard bends too easily, and slingshot doesn’t work properly
- Paper airplanes were fun tho 🙂
Anonymous Peer 2:
- I like that you used masking tape for the prototype to not waste hot glue
- Color the car body pls. Cardboard looks very scuffed.
- I think the ramp doesn’t do much
Anonymous Peer 3:
- What energy conversion is this
- The gong sometimes not work
Changes made:
- Removed gong and ramp
- Changed cardboard to colored foam boards (Yellow)
- Adjusted 3D Print model for slingshot (Reduced height, so it’s easier to stabilize)
- Made more paper airplane variations
Photos:
 My prototype
 Readied launcher (Couldn’t upload video)
 Launched Paper Airplane
![]()

 Final Product
Develop and Plan
Thinking Practices
My first few visions of my carrier were mostly aesthetics-based. I planned for them to take the shape of an actual carrier and add decoration on top of them. Soon I realized that it would take more time than I had to create that, and I had no valid reason for focusing on aesthetics anyways, as this was to show energy conversion, so I moved on to my next idea.
My second version of the carrier was very energy-conversion-based. It consisted of many parts: a ramp, a gong, a carrier, and an automatic slingshot. The carrier was going to be pulled back (elastic potential to kinetic), slide down the ramp (gravitational potential to kinetic), hit the gong (kinetic to sound), and automatically launch a paper airplane (elastic potential to kinetic). It was full of energy conversions, and I settled on this design for a while until I created my prototype. I could not get the automatic slingshot to work. I could not get a gong, and my peers told me the conversions were hard to identify since so much was going on so fast.
At last, I settled on a simple design that focused on two conversions from elastic potential energy to kinetic energy. This refined design removed the ramp and gong parts from my previous one, and the shape of the carrier was a simple upside-down trapezoid. I was contemptuous of this design as I had no experience in the design center, and this simple design would give me more room for errors. It also displayed energy conversion more clearly as one conversion was repeated twice through the pull-back mechanic and slingshot.
Design Concept
 Carrier Body Blueprint
 Slingshot 3D Model
Materials Needed:
- Card, foam, or felt boards, preferably colored
- Four elastic bands (Common yellow type)
- Hot glue gun and glue sticks
- Cutting Knife and board
- 3D Printed slingshot (Sent)
- Two sets of wheels and axels (four wheels in total)
- Masking tape (To keep boards in place when hot glue drying, will not be in the final product)
Techniques Used:
- Refined YouTube tutorial for pull-back: https://www.youtube.com/watch?v=cb2j40Loaek
- Hot glue to connect all components.
Plan
Success Criteria:
The final product needs to:
- Clearly display conversion from elastic potential energy to kinetic energy.
- Be mobile.
- Be interactive.
- Not break.
Components (Plan):
Car body
- Cut out all pieces of cardboard, dimensions as shown in the blueprint.
- Arrange the cut out pieces into the shape in the blueprint, and cover the connecting edges with masking tape from the outside, excluding the centerpiece.
- Hot glue one edge at a time, separate edges from the masking tape a little, and use the hot glue gun to glue the edges together. Remove the masking tape to test if the glue is dried. Wait for the glue to dry before moving to the next edge.
- Hot glue the centerpiece to joints from the top and bottom.
Wheel
- Prepare four wheels and two axels, dimensions as shown in the blueprint.
- Connect the wheels and the axels, hot glue ramps (glue blobs) right beside (but not onto) the wheels to keep them in place.
- Test if the wheels are functioning.
Slingshot
- Create a 3D model and print it out.
- Attach elastic bands to it.
Arrangement (When all components are finished)
- Hot glue the car body onto the axles, apply glue at the joints and make sure not to glue the wheels.
- Use the pull-back car YouTube tutorial to create a pull-back mechanic. Instead of using elastic bands to connect the axle and front, connect both sides of the wheels instead.
- Secure the slingshot on top of the carrier with hot glue, and test to see if it is secured.
- Test the final product.