Daniel

Be nice

Category: Science

Science Energy Transfer Reflect and Share

Show your final product through photos and/or video

A video of the product


Explain how it works/doesn’t work using scientific terminology

The mechanical key switch works because when kinetic energy is applied to the switch, the spring will trigger the key to move downwards, resulting in a clicking noise being heard. When the button is released, the potential energy stored in the spring will cause the keycap to move upwards.


Explain the areas you were successful in the product/process

Some areas where I was successful were in the development and plan stage. In this section of the project, I feel like I did an excellent job planning how I would build the switch. For instance, I drew several switch versions, and I added the dimensions that helped me construct the model infusion 360. However, some areas I did not do great were in the define and inquired stage. I could have improved my work quality and investigated more products that show energy transfer.


Explain the areas you need to improve in the product/process

Some improvements I can make for my product is to have a more complex structure for my stem. My stem is relatively simple and does not have a metal plate that converts kinetic energy into electrical energy. If I added the metal plate into the key switch, it would be a fully operational one that can input letters into a computer. However, Since I only had two weeks to create the key switch, I feel like my key switch is still great even without a the plate. Another adjustment I could make for my project is to create all of the parts using wood. Using wood will make the key switch more environmentally friendly and visually appealing. However, since I have zero experience using adobe illustrator and a laser cutter, using fusion 360 and 3d printing, my project would be easy and less time-consuming.


Explain the impact of this project on the environment and potential client/consumer.

Lastly, my product has a huge impact on the environment because it uses plastic filament for all the parts. The plastic used is not degradable, meaning that the plastic will never disappear. Although it has a huge impact on the environment, the mechanical key switch is extremely easy to convenient to create from a manufacturing standpoint. Since manufacturing this on a large scale does not require a part-to-part assembly, my product would be very lucrative because it is cheap to create and easy to build.


Summary

Overall, after looking at the success criteria set up at the beginning of the project, I believe that I succeeded because the mechanical key switch is a convenient and replayable toy. Furthermore, this toy teaches people about energy transfer because of the simplicity of the switch. However, one criterion I did not meet was making my product environmentally friendly which is a downside to my mechanical key switch. Some common misconceptions others had about my project were that it was “easy” and not as challenging as creating circuits. These people don’t understand that I spent a long time outside of school learning and using Fusion360 to make my parts for the key switch. More importantly, I had to go through multiple trial and error phases to achieve the final product I am satisfied with.  All in all, this project was successful because I feel like my 3d modeling skills have  developed and I learned something new.

Science Energy Transfer Create and Improve

After designing the switch, I decided to start 3d modeling with Fusion 360. To begin with, I first split the build into four pieces: the cube, upper housing, stem, and lower housing. I couldn’t combine them all in 1 part, so I created them separately. As I started building the cube, I decided to use the “fillet” feature to make the edges of the square smooth, and I used the function “shell” to create a hole in the middle. The first version of the cube looked like this.

Image from Fusion 360

3d printed


Since this was the first time 3d modeling, I struggled with the dimensions and the lower housing wouldn’t fit into the box. I ended up reprinting the cube and it was a success.

The Final Build

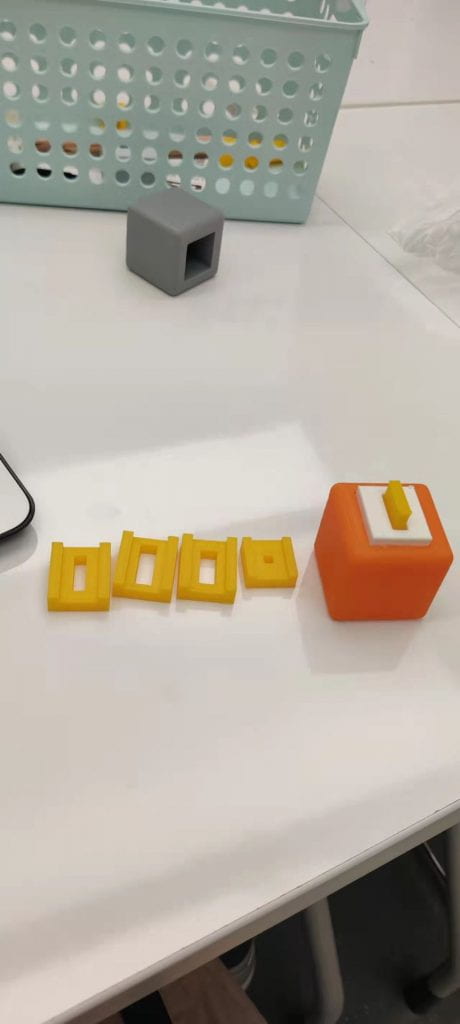
Next, after completing the cube, the part I had to build was the upper housing. The upper housing is essentially the “cap” of the switch. When I made the upper housing with Fusion 360, I failed multiple times because of the dimensions. Sometimes, the stem couldn’t go through the upper housing, or the steam would be stuck in the upper housing. I made sure that the hole the branch would go through would be significant to fix this. I ended up creating five prototypes of the upper housing.

How it looks on Fusion 360


The 5 upper housings I have built


After constructing the upper housing and cube, the next step is to create the stem. The stem is the most challenging part because it connects the upper and lower housing. Without a successful branch, the key switch will be unable to move vertically. I ended up creating four stems. In total, only 1 of them worked. This was because most of the failed stems had incorrect dimensions, which made me unable to put the spring inside the hole. In the end, I overcame this issue by being extremely precise with the measurements, and it worked.

The Stem

The stem (close up)


The last step to the mechanical key switch was the lower housing. The lower housing is essentially the “pants” of the switch. Unlike the stem or any other part, this was relatively easy to build because it did not require detailed measurements. MY first step in designing the lower housing was drawing it on paper recording all the dimensions. The next step was using the sketch tool infusion 360 to extrude the shape of the lower housing. After some trial and error added with some guidance from the TA, I successfully created the lower housing.


A Fusion Model of the Lower Housing


How the stems look

After creating all the necessary components for the switch, I needed to find a spring for my key switch. Initially, I had no idea what type of springs I should use. I consulted my friend Chris, who knew a lot about keyboards. He suggested that I should use springs that are not wider than 4mm because it would make it difficult to apply force into the switch. Furthermore, he advised me that the spring should have a 45g-90g actuation point. Anything higher than that will make it difficult to press the button. After consulting Chris, I tried finding the springs he suggested I should get. After a day of searching, I was unable to find any compatable springs because all the springs in the fab lab were wider than 4mm and had a higher actuation point than the recommended 45g-90g. I ended up using a keyboard spring that Chris gave me, and it was a 4mm spring with an actuation point of 60g.

The incompatable spring that I found in the fab lab

The keyboard spring Chris gave me


Once all the components were created, I stacked them and assembled them according to the blueprint I drew earlier. I used some superglue to connect the lower housing to the upper housing. In the end, the project looked a little bit like this.


A sound sample of the switch.


Science and Engineering Develop and Plan

What am I going to build for my project? 

In the grade 9 engineering project, I have decided to create a stress reliever toy that involves gravitational potential energy and kinetic energy. This stress reliever toy has a cube and a mechanical key switch. The cube will be hollow inside and can fit the automatic control. I will not be using prebuilt switches and keycaps to increase complexity and will attempt to create them myself. The first step to creating the button was to research the key controls. I looked at the Cherry MX switches and integrated some design elements to ensure that my design would be more viable using a 3D printer. After drawing all the blueprints for the key switch, I drew them all on paper and included the dimensions. It has the same layout as the Cherry MX switches but contains a difference in size. The designs drawn are here below.

The structure of a switch

A basic Layout of a Cherry MX switch


The blueprints of the design


Some possible materials being used are plastic filament and a metal spring. Since I will be 3d printing almost all of the components, I will need to learn how to use fusion 360.

For extra clarification of the blueprints, Please watch this video.

© 2025 Daniel

Theme by Anders NorenUp ↑

Skip to toolbar