Samantha

"I have no special talent. I am only passionately curious" - Albert Einstein

Designer’s Concept Statement

Front elevation

bird’s eye view 

View from an angle

Extra picture 1

Extra picture 2

My model is a representation of an inside world of a person who suffers from scoptophobia. I wanted to show the different components of the world; by exploring the different examples of my phobia, I found out all the things that the person might fear. The eyes are hanging in front of the backdrop, some are closer to the character as if they are going to pop out, and some are further but the character could still feel their attention. I create this effect in my model by using different layers, sizes, and colors for the eys. At the center of the backdrop, is a huge eye staring straightly at the character in the display case, as well as the audience. And in the middle of the eye, there is a reflection of the character. The character is curled, feeling uncomfortable and scared. I imagine my stage to be a proscenium, but with a slightly different shape of the stage. Flats are placed beside the legs of the stage to create a sense that the eyes are surrounding the character.

The inspiration for my model is taken from an imaginary museum, where objects are placed in display cases, and when I start thinking about the display cases, I really wonder how does it feel to stand inside them. At center stage, we can see a display case, and every person who stands in that case, even someone who does not have scoptophobia, can be uncomfortable. The display case represents attention from other people because the objects in the museum are always started at, and oftentimes there are judgments and criticisms, and the only thing that protects the character from those things is the thin layer of transparent glass. It portrays the feeling of anxiousness, frustration, and unable to breathe. There is also shattered glass all over the stage floor and cracks on the display case, this symbolizes that the little protection that the character is feeling (being inside the display case) is all broken and the character is fully exposed to other people.

Looking at the model, I intend to create an atmosphere of uncomfortableness and attention. When I was exploring my mood board, I found out dark colors are very prominent. In my model, the color choice, black, communicates the idea that there is nothing but the eyes, which portrays the fear that the person is feeling. The shattered glass all around the floor and the cracks on the walls and the ground also give my audience a feeling of melancholy, as if the whole world shown in this model can break very easily.

Scenic Design Practice: Sketching Space

birds’ eye view


Final design

Stage design-Rough Sketch

Scoptophobia-the fear of being stared at
The eyes on the wall symbolize attention, judgment, and criticism, which are all the fears that a person who suffers from scoptophobia.
In the center of the stage, stands a display case. The cabinet is made out of glass, it represents the feeling of being displayed and being looked through. The barriers around the display case show the rejection of people and attention. I created a semicircle stage where the person is surrounded by the eyes. I think this helps the audience to feel and imagine the anxiety standing in the middle of all the attention.

Mood Board – Scopophobia

The fear of being stared at. It varies in severity from person to person. Some people are afraid only when a stranger stares for a long period of time, while others fear even passing eye contact with a friend.

Scoptophobia.pdf

colorful, but strange

symbols: eyes-attention, judgment, criticism boxes: represents the person, wanting to hide himself transparent boxes: being see through

Scenic design vocabulary

Scenic DesignThe aspect of a production that gives a sense of ‘space” or location. Can be realistic or symbolic. Aids in creating ‘atmosphere’.

Mood boardA poster that contains imagery that will help focus the design or conceptual weight of a piece of theater

Thumbnail Sketchquick sketch or drawing that becomes the starting point for a design

Stage configurationthe layout of a stage in the theater you are producing the play

Groundplan/’birds eye view‘ – the top-down look of the design gives you an idea of WHERE things are on stage

Elevationthe FRONT look of a design gives you an idea of what you will see when you are looking at the stage

Flat A scenic piece that is used to build doorways and walls. Light, flexible, and can be built to order

Sight Linesthe view of an audience onto the stage. Sightlines are taken from many different seats to see what they see.

Masking flatflats or curtains designed to ‘hide’ the elements of the stage we don’t want the audience to see


Abstract the Arts of Design, Es Devlin Scenic Design

Inquiry:

To be successful, be open and come up with fresh ideas, and think out of the box. The thoughts can be strange or weird, but they must mean something to me.

Ingredients:

  1. Space
  2. Light: Light does not only mean light from a light source but things like mirrors and glass/paint under the light can also be the ingredient “light”
  3. Darkness
  4. Scale
  5. Time

Communicating:

She thinks that when you are on the top,  you are higher than everybody–this is the “power”. On the other hand, you are also lonely, and once you fall you are the one who hurts the most, this is the “vulnerability” of the throne. So she used very high boxes, which represent the throne, for the two artists to stand on.


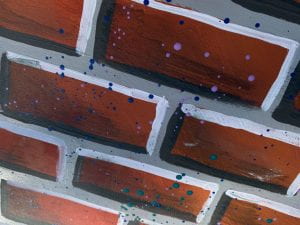
Scenic Painting Part 2

In the process of my painting, I used 5 techniques:

– scumbling

-lining

– highlights and shadows

-texturing

– spattering

1. Scumbling

This is a technique to create the background/bottom layer of the brick wall; we used three colors: brown, red and yellow. By using scumbling, I can create a more realistic wall because the colours are distributed evenly and naturally, so that each brick looks different.

2. Lining

Lining is a technique to line out the basic shape of the brick wall. We used some straps of wood to measure the distribution of the bricks, so that the bricks are similar in size

3. Highlights and shadows

It creates a 3-dimensional view of the brick wall. We chose a direction the light source is coming from; we used this as the reference and drew the  highlights and shadows.

4. Texturing

Not only the borders of the brick has to have lights and shadows, the  brick also needs shadows. Texturing uses dark paint mixed with water to create a thin layer of shadow. By texturing the bricks, the wall now looks more realistic

5. Spattering

Spattering gives the brick wall more diverse elements, the light colors contrasts with the dark paint wall, creating a richer scene.


Scenic Painting Part 1

Grade 9 Engineering Project-Create & Improve, Reflect & Share

Create and Improve:

23 Feb 2022:

Things I did:

1. I collected the materials I need for the circuits

  • batteries–these two batteries are 1.2 volts each, the energy collected will be stored in the batteries
  • solar panel–the solar panel used to collect the energy, it is around 5 volts
  • breadboard–the breadboard is a perfect choice to test my circuits and check if they work quickly before finalizing my work
  • alligator clips–connect the components together
  • switches–so that I can control when the solar panel is charging the batteries and of course control the motor
  • motor–spins the Ferris wheel
  • LED lights–work as diodes

2. I tested the voltage and the positive pole & negative pole of the solar panel and the batteries with the multimeter

  • the voltage of the solar panel is around 5, the voltage of the batteries is 1.2
  • If the voltage of the solar panel is lower than the voltage of the batteries, the batteries will transfer energy back to the solar panel, which can break the circuit
    • to prevent this situation, I need to add diodes in my circuit, such as LED lights
  • Using the multimeter, I found out the positive and negative poles of the solar panel and the motor.

3. I tested some components of the whole circuit

  • I managed to power the motor and connect a switch to it

Things I need to work on:

  1. learn more about circuits, watch Youtube videos and ask the teachers
  2. Connect the components together by combining them using the breadboard by the next class
  3. start making the base of my Ferris wheel

25 Feb & 1 Mar 2022:

Things I did:

1. learned how to build the circuit with Mr. Michie

  • a LED light was placed in the middle
    • prevents current from flowing back
    • it tells us if the solar panels are charging the batteries
  • a switch is placed between the solar panel and the batteries
    • the batteries can be damaged once it is overcharged
    • the switch can control whether the solar panel is powering the batteries

2. Finalized measurements of the base and started collecting materials

Things I need to work on:

  1. the motor was spinning too fast, do research on how to slow down my motor
  2. transport the whole circuit onto a circuit board, ask Mr. Michie


3 & 7 Mar 2022:


Things I did:

1. soldering

  • diode
    • In my previous testing circuits, the LED lights worked as the diode, therefore, when the light is shining, I can interpret that the circuit is working. However, the diode can not light up, I am not able to figure out whether the circuit is working.
    • After asking Mr. Michie, I solved this problem by using the multimeter, Testing if there is electricity flowing through the wires can help us find out if the circuits are working.
  • electric tape
    • If the metal part of the wires touch, it can cause a short circuit
    • using electric tape can prevent the short circuit from happening

2. made a wheel for my model

Things I need to work on:

  • decorating my project
  • finish making the ferris wheel

Reflect and Share

Things that worked well:

  • The soldering process worked out quite well, it stables the wires very well and keeps my circuits organized
  • The Ferris wheel is a good choice to make, it has a simple shape and it is recognizable, the materials required to make it is also very easy to find

Takeaways:

  • In the process of this project, I developed a lot of new skills. I learned more about circuits and soldering. Before this project, I did not have any experience on circuits, but as I learned how to make my project by looking at YouTube videos and learning from teachers, I was able to make a toy that transfers energy by myself
  • My peers gave me a lot of help. They were very supportive and gave me a lot of suggestions. also, I was able to work on my project with others that are doing the same thing, so that we can learn from one another

Things to Improve:

  • Planning is the most important aspect that I need to work on. At the end of the project, I was not able to finish the Ferris wheel. In the first few lessons, I spent most of my time testing the circuit. Therefore, the time to do the artwork in my project decreased, and I was not able to make the gondolas. Next time, I need to make a timeline, to better track my work
  • There were also acre technical issues in my project. The motor was still too fast. There are many ways to slow down the motor; I chose the easiest one, by adding weight to the Ferris wheel. However, this is also the less efficient way. I was not able to make a system that can efficiently slow down my motor since I did not have enough time.


« Older posts

© 2024 Samantha

Theme by Anders NorenUp ↑

Skip to toolbar