Over the course of my life, I’ve read many books from different genres. I’ve read English books, Chinese books, fiction books, nonfiction books, fantasies, novels and many more. Out of all of the books, the one that impacted me the most was “Ender’s Game” by Oscar Scott Card. It was the first science fiction novel I’ve ever read. It was the book that got me into science fiction novels. I used to hate fiction books since I thought they were unrealistic and boring. I used to give up on books because I didn’t like the suspense and plot of fiction books such as “Harry Potter.” However, “Ender’s Game” was the first fiction book I have ever truly enjoyed. After that point, I’ve read many science and realistic fiction books. Currently, I’m reading “Animal Farm” by George Orwell. Previously, I’ve read books and overviews about this author such as “1985.” This book satirizes the political views and system of the Soviets. The author portrays the Russian revolution and Soviet Union using animals. After finishing this book, I plan on reading more nonfiction books.
Brian
"I have no special talent. I am only passionately curious" - Albert Einstein
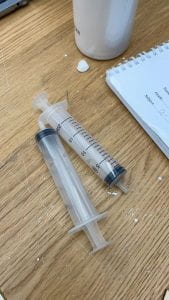
Syringe Catapult
by Brian Huang and Eric Zhang.


This is our syringe catapult we created over the course. When you push on the syringe, the catapult launches a projectile. When the syringe is pressed, the air travels to another syringe connected to catapult and pushes it, thus launching the catapult.
Over this project, our biggest takeaway was learning how to create a design based on the design process. We learned how to engineer a catapult by generating ideas, creating plans, and creating the product.
Reflection
Success criteria
-Able to launch/fire a small ball
-Teaches students about energy transformation
-Clearly shows mechanical, potential, and kinetic energy
-Students can have fun playing with the toy
-Safe to use and appropriate for classroom environments
-Uses a syringe lever
-The base and platform are stable
-Inclined slope on the triangular base at an accurate angle
-The platform stays connected after each launch
-Neat/uses different colored popsicle sticks/
Strength:
The strength of this catapult is that it functions properly, and it is stable. The base is strong and supports the rest of the catapult. The syringe is firmly attached to the platform with hot glue. The syringe catapult functions well and meets the intended purpose of launching a small projectile. The product clearly shows the types of energy transformations with the syringe lever and catapult. The base is inclined at the intended angle, and the platform stays connected after every launch according to the success criteria. Afterall, our product completes our objective of allowing students to learn about energy transformation in a fun catapult toy.
Weaknesses:
According to the success criteria, our weakness would be the visual appeal. We could have made the design neater. On some parts of the design, tape can be seen sticking out and hot glue can be seen from outside. Another weakness is that we could have increased the size basket on the catapult. The small size of the basket only allows a small projectile to fit. Any larger ball or object would not be able to be launched by the catapult. This limits the range of objects students can play with on this catapult. If we were to do this again, we would also change the length of the catapult to make it larger. And increase the angle it launches at so it would launch with more force.
What are you most proud of?
For me, the part I am most proud of is the creating part. It was a lot of fun to glue the parts together and test the prototype. I am proud of finishing this project and I am proud that the catapult works successfully.
What was most challenging?
For me, the most challenging part was the planning phase. Drawing the models and figuring out the measurements were particularly time consuming. It took me a long time to draw the plan with the right measurements according to the materials we have.
How and why your toy/device meets the design specifications?
Our design meets our design specifications because it corresponds well to the target audience and objective from the define and inquire phase. Our catapult was created to help students to learn about energy transformations while having fun. This design suits that well because it targets the user and target audience of students and teachers because it is safe to use and fun for kids to play with. The product meets the desired outcome when it clearly shows energy transformation in a toy that can be used to teach energy transformation to students. Teachers or parents can teach students about energy transformations using this simple toy, providing an example for students to learn from in their daily life. In conclusion, our design meets our design specifications by linking it with our success criteria, desired outcome, user, goal, target audience, and beneficiary.
Overview of the design process:
Throughout designing and creating this project, we followed the design process. We followed the design cycle. In the beginning, we started with define and inquire phase. In this phase, we had defined the goal, user, target audience, success criteria and desired outcome. Our goal was to demonstrate energy in a toy. Using the goal, we also defined the other parts of our define phase and filled out our success criteria. After defining our focus, we started researching design ideas from precedents, and we decided upon creating a catapult that demonstrated kinetic and potential energy. Then we decided to combine the catapult idea with a syringe lever to create a syringe catapult. Next, we started the development and plan phase of the design cycle. We developed our design concept by combining the catapult toy and syringe lever, and we planned our design by creating concept sketches and design plans. We created a sketch to show our design concept and present our idea. Then we created a plan with measurements of each piece and the materials required. When we finished developing our ideas and planning our design, we started working on the create and improve phase. First, we created a prototype to model our design so we can seek feedback and find errors in our design. After receiving some feedback and finding new ways we can improve our design, we started iterating our success criteria and plan to create our final product. We applied the iteration and changes onto our final product and finished our syringe catapult. Finally, we reflected on the strength and weaknesses of our catapult and analyzed it according to our success criteria.
Create & Improve
During this phase, we started putting our plan into action. First, we created a prototype of our catapult. By doing this, we can visualize our product and find errors inside our design that we can improve on. We assembled our prototype together by taping popsicle sticks together and using a triangular wood block as the base. We adjusted our design from the plan by replacing the basket with a cylindric shaped basket glued onto a wooden platform. We assembled our pieces together and created a prototype.
Our prototype:

We created the prototype to find errors or ways we can improve our design. The strengths of our prototype were that the basket functions well and the length and width of the platform was ideal. After prototyping, we realized the platform on the catapult was not stable enough. We will improve this by adding more popsicle sticks on the back to improve the stability. We also realized that a triangular base is not optimal for this design since the incline of the slope was at the wrong angle. For our next design, we should account for the angle of the slope by stating it in our plan.
After analyzing our own prototype, we sought feedback from some of our classmates to find areas we could improve on. After our classmates tested our prototype, we received some feedback we can iterate our design on. Some users said that we can improve our design by making it more visually appealing and more convenient. A problem that our users faced was when the catapult had to be manually reassembled every time it was launched. We decided that we will use rubber bands to connect the platform on our next design so that our platform does not have to be reassembled manually every time it launches.
After analyzing what we could improve on our final product, we started reconstructing our plan so that it meets our new requirements. We reconstructed our plan by making new measurements and adjustments while adding new pieces to our design. We did this so we would have a clear and concise plan to follow while creating our final catapult.
Our new success criteria:
-Able to launch/fire a small ball
-Teaches students about energy transformation
-Clearly shows mechanical, potential, and kinetic energy
-Students can have fun playing with the toy
-Safe to use and appropriate for classroom environments
-Uses a syringe lever
-The base and platform are stable
-Inclined slope on the triangular base at an accurate angle
-The platform stays connected after each launch
-Neat/uses different colored popsicle sticks/
Our new plan:

On our new plan, we recorded more specific measurements for each of our sides. We clarified the angle and slope of the base. We broke our design into separate parts to show each part more clearly. Our design included the new improvements we added according to the feedback we received from our peers and our new success criteria. We included the new rubber bands that would tie the platform to the base, so it stays connected after each launch. We applied different colored popsicle sticks for decoration. We stabilized the design and reinforced the platform with an extra layer of popsicle sticks while adding a square base to hold the syringe upright. With all our adjustments, the plan states our design according to the success criteria and feedback while guiding us through the creating process with precise measurements.
After recreating our plan, we followed the plan and started constructing our final catapult.


We constructed the base of our platform by taping 2 platforms 4 popsicle sticks together. Next, we added 3 popsicle sticks on top and another 4 popsicle sticks on the bottom to reinforce the stability. We used different colored popsicle sticks to increase the visual appeal.

Next, we got a piece of wood and cut it to the shape and angle that we need according to our plan. We cut it according to our measured angle and length on our plan to form a triangular base.

After completing our base, we connected 2 bars made using popsicle sticks to create a holder for the syringe lever.

Then we connected the syringe lever to the platform by hot gluing the syringe to the platform. We also added a wooden board on the platform to hold projectile that would be launched.

We attached a popsicle stick at the bottom of the platform. Then we glued 2 circular handles on both sides of the base. Finally, we connected the popsicle stick to the 2 circular handles with 2 rubber bands. This fixes the problem so that the catapult does not have to be manually reassembled. The rubber bands connect the base to the platform so that it stays connected after each launch.
We finished the catapult at the end by adding a cylindric holder that would hold the projectile and stabilized the syringe lever by connecting it to the holder.
Finished Final Product

We tested our final product and it functioned properly. It was able to launch a small projectile while demonstrating kinetic, potential, and mechanical energy. Mechanical energy was shown when the syringe was pressed down while potential energy was demonstrated when the projectile was lifted by the catapult. Finally kinetic energy was shown when the projectile was launched and fell. Overall, our product worked as intended while being improved according to our new success criteria.
Develop and plan
Share your design concept:
Materials:
-Popsicle sticks
-2 syringes
-patristic tube (pipe)
-Duct tape
-wooden basket/box
-wood triangular block
Photos:
Design Concept

How it Works

Develop a plan for preferred design:

Success criteria:
-Able to launch/fire a small ball
-Teaches students about energy transformation
-Clearly shows mechanical, potential and kinetic energy
-Students can have fun playing with the toy
-Safe to use and appropriate for classroom environments
-Uses a lever
Explain how you used design thinking practices to arrive at this iteration of your toy/device.
Our success criteria stated that our product should be a toy that is fun for children to play with while demonstrating energy transformations. While researching about precedents, we found out about a catapult toy that clearly demonstrates potential and kinetic energy. In the beginning, we wanted to create a simple catapult toy controlled by buttons. However, we decided to iterate this design to involve a syringe lever when we stumbled upon a lever device that is controlled by 2 syringes compressing on each other. We took inspiration from the design, and we decided to implement this design into our catapult. We combined the two design ideas into a design concept. We decided upon a catapult that is controlled by a syringe lever. After our concept was developed, we started looking for materials and planning our design. We took measurements of the materials and iterated our models and plans according to our available materials.
Goal:
-Design a device that can be used to teach energy transformation
-Make a toy that converts energy
User Story: Students are learning about energy transformation. They need a tool and example to help them learn more about energy transformation throughout a toy. The Product will help students learn about energy transformation while having fun with their class.
Success Criteria:
-Able to launch/fire a small ball
-Teaches students about energy transformation
-Clearly shows mechanical, potential and kinetic energy
-Students can have fun playing with the toy
-Safe to use and appropriate for classroom environments
-Uses a lever
User/Beneficiary: Children in schools that are learning about different types of energy. This toy would help enhance learning by providing a toy they can use to provide an example of energy transformation.
Target Audience: Schools, Parents, Teachers, Students
Desired Outcome: The product provides a solid example of energy transformation to help students learn about the topic.
Energy type: Mechanical-> Potential -> Kinetic
_______________________________________________________________________________________________________________________________________________
Precedents:
CATAPULT TOY

We will make a catapult that can be launched by a syringe lever. When you push on the syringe, it launches to form potential energy from mechanical energy. Then, when the ball launches, it creates kinetic energy
Syringe

Mechanical—->Potential—->Kinetic
1. What is the purpose of your device/toy, how does it function, and who is your user?
The catapult teaches students of energy transformation between mechanical, potential, and kinetic energy. The toy allows students to have fun playing while learning about energy transformation. The students can push the syringe to launch the catapult and record their observations of energy while having fun with the toy. Parents and teachers can use this toy to teach their kids or students about energy transformation.
2.What is the environmental impact of your product and is it durable and safe?
Our product can have environmental impacts by renewable wood resources instead of plastic materials. This is environmentally friendly. It is durable and safe for students to use. The syringes are recyclable and can be reused when the catapult is disassembled. The wood pieces and materials used can all be recycled after the catapult is disassembled.
- What precedents inspired you? What did you take away from them? How did it inform your choices?
We were inspired by a catapult toy. It clearly demonstrates kinetic and potential energy while it is fun for children to play with. We also took inspiration from a lever made from pressing syringes that shows mechanical energy. We added the syringe design to the catapult so pressing the syringe would launch the catapult. We combined them so students can understand all three types of energy. These precedents combined gave us inspiration about how we can create a toy that transfers mechanical to potential energy that also transfers to kinetic energy.
- How are you making your product original and/or using creativity?
Our product is made from a combination of a catapult and a syringe lever. We will modify the syringe lever and connect it so it launches the catapult. This will show the mechanical energy converting to potential energy and kinetic energy. We combined the two precedents to create a creative and original product.
While many issues goes on in the public, welfare is a rather underrated topic that’s ignored. Is welfare actually benefitting society by providing financial assistance to those in need or are there more negative effects? In this video, I tried to explain the positive and negative effects in a comedic manner.
Over the course of this project, I decided to create a pizza box that would heat and keep your pizza warm. Since I order pizza often, I know that the pizza often gets cold when it arrived. To fix this problem, I created a box that would ensure that the customer would get fresh hot pizza. I wrapped the pizza box with tin foil and I plan to add heaters inside the box for the actual design. My biggest success for this project was being able to create this prototype with the limited materials I had. Skills I’ve learned while making this is to make different sketches and plans. Overall, I think my prototype was successful because it works and it can keep your pizza warm. Something I’d like the change about this prototype next time is that I would make the pizza box bigger.

The prototype from a bird’s eye view

The top of the box

The interior of the box

The prototype from a sideways view
A sketch of the design with explanation
Over the course of this project, I researched about the topic of welfare programs. I want to address both sides of arguments about wether welfare benefitted society. I wanted to provide an unbiased analysis on welfare programs. The reason I chose this topic is because we had a relative family in Canada that is using welfare benefits enable to overcome their tough situation. In the essay, I addressed both the positive and the negative impacts of welfare.
This is my final bluetooth speaker:

In this design, I used the design aesthetic mid-century modern. In this course we learned a lot about mid-century modern so I decided to utilize it in this design.
Mid Century Modern

What did you struggle with most during this project?
Over the course, I was successful during most part of the project. However I ran into a few technical problems when I was printing the design. When I submitted the design there were a few errors that I had to fix enable for the design to print. Overall, I am proud of my work during this project.
What’s a skill you learned or improved on over the course of this project?
During this project, I learned to create designs with Affinity Designer. I learned to create shapes and learned to use tools in the App. I also improved on staining wood in this class. I have learned to stain wood previously in woodworking. In this course, I improved on staining when I learned to stain more neater.
What aspect of this project are you most proud of?
I’m most proud of making this design on Affinity Designer. I worked hard on the design, and it took me over 4 classes to finish.
This is a historical fiction journal that I wrote about someone who experienced the Cuban Revolution first hand.
In this journal the main character goes through the struggles of the Cuban Revolution. He is a farmer telling a story from the perspective from an average peasant’s perspective. As he suffers from the tough conditions and oppressive law, he asks himself, “Should I stand up and fight?” Conflicted with the different outcomes of his decisions, he makes his choice.
The results of the Cuban revolution can be controversial. On one hand, Batista’s government oppressed its people, and Castro helped achieve better standards for Cuba. Castro helped construct better social equality, making healthcare and education more accessible. On the other hand, the revolution led to many other conflicts that could threaten to bring a catastrophe. For example, the Cuban Missile Crisis was infamous during the cold war for hanging the world off of a cliff. However, I would insist that the benefits of the revolution outweighs the negatives. The revolution was necessary for the Cuban people since Batista oppressed the lower class. Due to the harsh conditions for the people, it was inevitable for a rebellion to form. It is estimated that Batista murdered up to 20,000 Cubans. Imagine yourself in a situation where you work hours everyday, cutting down sugar canes. After your hard work, you anticipate for some compensations, but your salary is minimal, barely able to support yourself. It seems like you have no hope of improving under the current government. A revolution seems like the best outcome for you. Subsequently, the leader of the rebellion, Fidel Castro, promises to bring social equality to Cuba. The Revolution brought equality to Cuba, and improved the standards of the lower class. Additionally, Castro limited landholdings, allowing the poor to be able to claim more land. He bridged the gap between the social classes. I would argue that this is an improvement for Cuba as the majority of people used to be peasants suffering from Batista’s oppressive regime. In general, the Cuban revolution was beneficial for its people since it brought social equality, improved countless lives and established a more supportive government.
© 2025 Brian
Theme by Anders Noren — Up ↑
Recent Comments