DEFINE & INQUIRE
This engineering project aims to create some sort of mechanism or a toy that shows energy transfer.
When deciding what kind of object to create, I had to consider the available materials, the lab equipment required to refine those, and my capabilities. I knew it had to be both something simple and have noticeable effects, so something that converts elastic potential energy to kinetic energy to launch something would be good enough. So I thought about making bows, which would be simple, but also need some woodworking, so I decided that’s not it. And also, launching solid projectiles might be a bit too dangerous. But I still couldn’t give up the projectile idea, which led me to ponder what kind of projectiles wouldn’t pose a threat to people. That’s how I came up with the plan for a paper airplane launcher. Since woodworking seemed way too time-consuming, and because I had spent one extra session on planning, I needed something quick to build the body. so I tried making 3d models since I had some experience in those.
Here is a flowchart to represent my thought process:

DEVELOP & PLAN
The video above was my main inspiration. While the size and design are very different from what I had in mind, the trigger, elastic bands, and the “rail” for the plane were very similar to my vision.
The planning stage of this thing was slightly frustrating, as I had to consider all the available materials and figure out various mechanisms of the launcher, decide on what material to build the body with, how big each part should be, etc. In my sketches, I tried outlining the rough dimensions of the build.

Early sketches 1
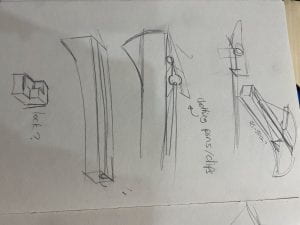
Early sketches 2
While drawing these sketches, I began thinking about the trigger mechanism for the launcher. While making a proper trigger with 3d modeling should be possible, it would add complications to the parts. Then I had a flash of inspiration and decided to use a clothing pin. Besides, there’s also a risk of incorrect printing if there are too many hollow spaces within such a thick piece. In addition to that, because the length of the body was bigger than the printers, I had to devise ways to split and combine different sections. While that was relatively simple, the biggest problem in this phase was the “Bow” of the launcher, arguably the most important section of the entire mechanism. Making a classic bow shape would not be ideal, as I have seen how fragile the plastic can be. After multiple designs and head-scratching, I had to be content with a solid chunk of plastic as the bow. This consequently limited my material options as the bow itself cannot be bent, meaning the string has to be the one doing the stretching.


CREATE & IMPROVE
Most of the frame was printed, so the only real work should be stringing the launcher and gluing the trigger on the slot… or so I thought. Of all the pieces I could make mistakes on, I made measurement issues in the “head” of the launcher, which is the most critical piece. The connectors on the head were offset by around half a centimeter, so the front of the launcher was slightly misaligned. Thankfully, it was possible to cut and grind the extra bits off (Thank you, Mr. Hussack) and fit the parts together in the end.

dents from the sawblade

completed frame
After the frame was sorted out, it was time to string the launcher. The “Bow” of the launcher was made from a solid slab to increase durability and was done so because 3d printed plastic isn’t usually as bendy as actual wooden crossbows. So unlike crossbows, where the main energy comes from the tension of the bow, the string of the launcher has to be where the potential energy comes from.
I initially tied the string to the ends of the bow, but then the elastic band wasn’t stretchy enough to be pulled all the way back. I experimented with the placement of the string and eventually settled on tying the elastic band around the entire thing. As an unintended effect, the elastic knot could be tightened to put more strength on the plane, though the launcher seems to be less effective at a certain point. There are durability issues with the aircraft itself, but that could be fixed by re-enforcing the back of the plane.


Thankfully, my efforts weren’t wasted. And the first launch was a success. The airplane launcher is powered by the elastic potential energy within the elastic band being converted into kinetic energy when the tension is released. I was fairly surprised that the plane actually managed to fly, since i was worried throughout the entire process that either the force of the band might break the projectile or the plane would just plummet
although the launcher does work as is, while testing, I found many areas for improvements. to list a few, the string damages the plane quite a bit when launching, and it feels very uncomfortable when held. The aesthetics could be better too, but one major problem with 3d printed parts is that it is very difficult to change the design once it is printed, so if I want a drastic change, a whole new piece would need to be printed. Which is very wasteful, to say the least. If I were to make a 2nd version, the bottom part would be rounded off to provide a more comfortable grip. I could add ridges and bumps too, like in one of the sketches. Although I’d like to make the bow a bit wider, that is unfortunately impossible since that is the widest thing the printer can print.
But in the end, I am satisfied with what i was able to produce. it is simple, it is functional and it is also somewhat fun.


Recent Comments