Hobbers
"I have no special talent. I am only passionately curious" - Albert Einstein
The Cuban Revolution lasted from 1953 to 1959, and was led by the legendary Fidel Castro. This revolution occurred for many reasons, with one of them being the corrupt government, led my former Cuban President/Prime Minister Fulgencio Batista. The United States, which at the time had a huge influence and presence in Cuba, also supported Bastista’s leadership. There was also a huge inequality with Cuba’s economy and society, with only a small group of very wealthy people, the “Elites”, while a majority of the population struggled financially. Life wasn’t great for most people, but after Fidel took over, the economy and quality of life improved.
iframe src=”https://isbdragons-my.sharepoint.com/personal/hobbers_chan_student_isb_bj_edu_cn/_layouts/15/embed.aspx?UniqueId=f4f5e671-71a2-413f-a591-075e08eca578&embed=%7B%22ust%22%3Atrue%2C%22hv%22%3A%22CopyEmbedCode%22%7D&referrer=StreamWebApp&referrerScenario=EmbedDialog.Create” width=”640″ height=”360″ frameborder=”0″ scrolling=”no” allowfullscreen title=”Cubanvideo.mp4″></iframe>
I am making an for a client. Below is my process journal for this experience. Follow along and see how I create it.
Book title: The 57 Bus: A True Story of Two Teenagers and the Crime That Changed Their Lives
Author: Dashka Slater
Genre: LGBTQIA+, Social Justice, Crime, True Crime, Non-Fiction
Release date: October 17th, 2017
Quick Intro:
The 57 Bus, by Dashka Slater is a Non-Fiction book about 2 teenagers, Richard and Sasha. In this book, Sasha is portrayed as the protagonist and Richard is the Antagonist. This book highlights the importance of Gender Identity, as one of the main characters, Sasha identifies as “genderqueer” so they’re neither male or female. In addition, the main plot is built of off the crime that Richard committed towards Sasha, as one day Richard lit Sasha’s skirt on fire on the 57 bus, a crime that changed his life. As for Sasha, she eventually recovered completely, but not after undergoing surgery and experiencing 3rd degree burns.
Below are 4 notebook pages that I’ve done in class that I believe highlight my thinking about this book.

The first page is the cause and effect page: I used 2 examples from the book, both of these examples are pretty important events in this novel that contributes to the plot and a lot of the story is built off of these 2 events. This shows my thinking about the book because as I read on, these causes have more and more effects, so as you can see, each cause has many effects. Both of these examples also connect to one of the central ideas I wrote about, which is that teenagers do dumb things or make bad decisions that results in serious consequenses.

Second page I did is re-reading, explanation is on the page. These pages that I re-read helped me understand the whole book better and everything that was going on, because at first it was a bit confusing. But after reading further I made connections and understood how all these event connect together and also shows the central idea of the novel.

This page was the first page I did, I believe I wrote this when I was about 70 pages into the book. This central idea mainly focuses on the whole LGBTQIA concept, its effects on society and to the characters/people in the novel.

Last page for this blog post is the descriptive page. Although this doesn’t really connect to the central idea, I really enjoyed writing this page and those descriptive pages I chose were nice as well. It just made the book more fun and enjoyable to read and I think the author did a great job to help the reader picture the scene I chose.
Short paragraph:
Overall, I agree with 86% of the main ideas that I shared on my infographic about humanism. I feel that humanism is great, it changed how humans viewed their lives on Earth, life became interesting and meaningful, and it changed the world. I would say I am a humanist, because the main ideas I agree with quite a lot and I think they are the right way of life, for example, one of the main ideas is the value of education and learning, in subjects like history, art, language, literature, and science. I agreed with the education part 5/5 because education is of course really important in life and I agree with it.
Infographic PDF:
idk why it turned into a hyperlink, but yeah click it to see my infographic
#humanities #humanism #canva #summative #renaissance
Story title: “Button, Button”
Author of story: Richard Matheson (About the author)
Conflict type:
The conflict of “Button, Button” is the internal conflict of the main character, Nomra (Arthur’s wife). She has a tough decision to make, because on one hand, if she presses the button, she is rewarded with $50,000. But on the other hand, someone will die. Norma really want to press the button, for the prize money, and she believes that the person who will die is just some random person that she doesn’t know. However, his husband convinces her not to press the button, “‘Because it’s immoral'” (Matheson 65).
How does your poem shows the conflict:
One of the phrases I chose to include in this poem to highlight the internal conflict is “Restrained herself”, this phrase is in line 74 of the text. I think this highlights the internal conflict really well, because she is restraining herself from hanging up the phone, as she was talking to Mr. Steward, the guy who gave Norma the button in the beginning of the story. In this part of the story, Norma is feeling hesitant on pressing the button.
#foundpoem #grade8 #humanities #conflict #summative

Design blog
Part one:
So, when the laser cut project was announced, and the options were given (phone holder or lamp), I chose the phone case, because well I have a phone, and I thought it would be useful to store my phone that way. In design class, I first measured out the dimensions of my phone, and wrote it down, since that would be very important, as this can help me find out the size of the phone holder I would make. We then downloaded the fusion app, after every student in the class has downloaded the fusion app, we started learning fusion about the different things you can do, how to use their functions and tools, and we learned fusion the basics and fundamentals of fusion for a few weeks into online learning. For the design and drawing on the phone holder, I chose to do I basketball themed one, because I like basketball and that is what I am passionate about. After learning all the necessary basics, fundamentals and tools in fusion 360, we started to work on our prototype.

![]()

Part two:
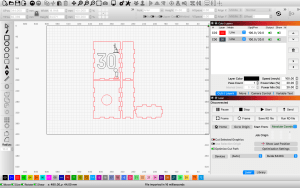
When we started making the cardboard prototype, I ran into a few difficulties, firstly, was making the fingers, I used the rectangular pattern to make the fingers, and it was just really time consuming and sometimes I would mess up, and making the fingers was just really irritating for me. So, Ms. Kim recommended this website called “makercase” to me and the rest of the class, and it instantly made my job so much easier, once I went to the make case website, I just had to enter the dimensions, choose the fingers option and made it an open box, that is it, then just download the dxf file and import it to fusion. Once I got the dxf of my box into fusion, I imported the images of my designs, in fusion these “images’ are called “canvases” and after I imported the images, I traced the with the spline tool. There are 2 spline tools, the first one is called fit point spline and the second one is called control point spline, I tried both out to see which one I should use, and for me personally I find using control point spline was a bit easier for me, especially if your design has a lot of curved line in it, for straight lines it’s easy to trace with both, so I went ahead and used control point spline to trace my designs. In addition, I also used the 2-point circle tool to make a circle cut out, for my magnet which will be glued on once the final is made, the magnet is on the back of the phone holder, and so the phone could just stick to the metal door of my locker door using the magnet. After I finished all the designs and tracing, I downloaded the dxf file of my phone holder, and imported it to light burn, the process for light burn is a lot simpler and it just took me 5-6 minutes, once I got the dxf file to Lightburn, I highlighted the whole thing and chose the red option, which is cut, and the designs I chose black, black is to just etch the drawing or design on the cardboard, and red to cut all the way through. Then I downloaded the Lightburn file and sent it for approval for the prototype. The file was approved, and the prototype was laser cut and brought back to me for the next class. The prototype came out the way intended, the designs looked good, and everything seemed fine, except that the cardboard burned a little bit on the corner, but that’s the material, on wood, it won’t burn. The hole for the magnet was a bit too big, 1mm too big to be exact, so I went back to fusion and shrunk the circle’s diameter by 1mm, downloaded the dxf, imported it to Lightburn and this time, the file would be named wood instead of cardboard, since now I’m going to make the final. The file for the final was approved and it got sent to laser cut. The pieces of wood were cut out, I glued all the pieces together, sanded down the hold for the magnet a bit, and glued the circle magnet on, waited for the glue to dry and I finished the project.


Part 3:
Part 3: Reflecting & Sharing – RS1
Reflect on the course overall and your actions, attitudes, and performance. In this part of the blog, you will address the following three areas. These are required.
What tips, tricks, and advice would you give to the incoming students?
First, use makercase to make the fingers, it would save a lot of time and it’s easier, secondly, save your files often, be careful not to lose your files, because that means you will have to restart.
Consider: what would have helped you if you knew it at the start of the course?
That using makercase was a lot faster, I did waste some time making the fingers on fusion, if I knew about the maker case earlier, I would’ve saved a lot of time.
What would you, individually, do differently if you could go back and have the class over?
I would’ve spent more time decorating; I think that that would be something to improve on.
Consider: design ideas, work effort, mistakes, challenges, level of difficulty, how you did or did not challenge yourself
Working through this course did take a lot of effort and patience, making things on fusion, running into tech difficulties sometimes, and learning how to use fusion and Lightburn correctly and effectively was quite challenging for me, and I did challenge myself, through making all the little changes and doing this project with much effort and careful thought and consideration.
What would you (the student) want to be changed about the course so I (the teacher) can make improvements to the course?
I wouldn’t really change anything, but one thing I would like to see changed is maybe more options on what to make, for example, maybe they could’ve made a wooden pencil cup for some other options and stuff.
Consider: the projects, how the class ran, activities during the class, what to drop, what to keep, etc.
I think overall the class ran quite well, I enjoyed most of the activities, what to keep is the videos regarding the tips and tricks about fusion, what to drop, I would probably drop the utensils activity, I just didn’t really find much interest orenjoyment when doing this activity, but other than that, I think the class was pretty good.
Think: what would have made it better for you?
The videos with tips uploaded on dx made it a lot clearer for me, it helped me learn things about fusion better and it helped me remember how to use all the tools and functions.

Final thoughts on design class:
I think overall I enjoyed this course, the laser cut project although difficult and sometimes irritating because of tech issues, it was fun for me, and I really enjoyed it. I learned a lot about fusion and it’s the first time I did something like this, I never used software like fusion 360 and never learned anything about laser cutting, but I’m glad I took this 1 semester long course, and it was cool.
Part 1:
The ideas my partners and I came up with during brain storming were the lasagna spoon, the noodle spork (I just found out it already exists), and we eventually chose the use the grippy chopsticks as out final idea. My partner and I thought about these ideas, by talking about foods that we had problems eating, and how we can solve the problem. For example, we came up with a utensil for lasagna, the problem is that when we eat it (with a spoon or fork) the ingredients and layers falls apart, and leave a giant mess, so we thought of making a spoon that is deeper, and contains the lasagna, so it doesn’t fall off.


Part 2:
For part 1a, most of the feedback for improvement is better drawing, or make the drawing more neat, so we used this feedback and tried to draw better in parts 6 and 7, we refined the drawings after that, and make it look better.
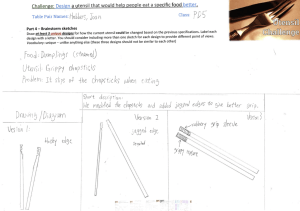

Here is the feedback
Stars:
Good idea
Good solution
I like how you showed your work by writing problem: solution:
I think the idea for the chopsticks is creative
Explains well
Good solution
I like how creative your invention are
I like you explanation
Ideas are good
Problems are real
Lasagna idea is cool
Dumpling
I like how you tell the problem and then the solution
Very creative
Creative
Good solution
Good wards
Drawing good
I like how you make your design simple
Wishes
Add more detail
More neat
More drawing
For the forkspoon its already a thing and figure out if the edge of the chopsticks would cut through the food
More detail
Neat
Drawing could be neat
Make your drawing clear
Make more detailed drawings/diagrams
Make a better diagram
Too simple
The spoonfork is already been invented
Isn’t it quite hard to get the grip side pointing in
Part 3:
The grippy chopsticks strength is that it provides grip to foods that slip off of normal chopsticks, for example dumplings, and we added some rubbery grip material to the tip of the chopstick to prevent it from slipping off, one weakness

Elevator pitch video
© 2024 Hobbers
Theme by Anders Noren — Up ↑
Recent Comments