Over the course of the period I like to call: “Online Learning III”, we have begun the E-Textiles unit in Circuits class. One of my projects, the Christmas Tree Pin, was made of cut out felt pieces and electrical components like the battery holder and conductive thread. The combination of felt/fabric and electrical components are called E-Textiles.
My latest project is a little more complicated. Over the course of a month or two, I have learned how to correctly sow, name and utilize electrical components so that they both look decent and work decent, although I am still working on consistent backstitches, a way of sowing that involved doubling back on the last stitch so that there is a continuous line that can be used in the design. The latest project, instead of just including a switch and a couple LEDs to light up mindlessly, includes a CPX, that looks really complicated, but in reality is quite simple to use.

Christmas Pin
As you can see, my previous project had ugly grey and yellow streaks that look out of place in the green, brown and turquoise.
The CPX, as shown below in the pictures of my project that serves as the “core’ of my decoration/design, is a rounded circuit-board that consists of neo-pixels, a sort of LED that uses Red Green and Blue lights to light up with whatever color is required, pins, the part where conductive thread is connected to and leads the electrical signal along its’ thread, sensors for the sort who like to take interaction to another level, and some buttons that can be coded.
I thought that using normal thread as part of the design and hiding the “ugly but useful” conductive thread was a bit bland, so I decided to use backstitches with the conductive thread with the design, and the circuit being the design itself. I sew all of this onto a black sheet of fabric that I manually cut and sow onto a bag, so that it looks like the circuit is “infecting” the bag with a glitch of some sort. Personally, I think that using the conductive thread for more than one use, and including the circuit in the design itself is better than having to cover the random odd grey stitches in a perfectly unspoiled, pristine design. If you have any thoughts on this, you can comment your opinion with the “comment” function of this website.

The front side of my project, yet to be finished
My improvements, other than hand-sowing, lie, in what I believe, the planning department. At the start of this unit (or rather, this class), I struggled to draw an accurate, clear model of what I wanted my project to look like, and actually get it to work. But now, I can design and plan my project with generally clear drawings, with LEDs, positives and negatives, and pin locations included. If I don’t get the design right first try, or I miss something, I can take constructive criticism and improve it (hopefully). Down below, I have a picture of my plan, the original plan being unfunctional, but after Mrs. Kim gave me an idea of what a functional design should look like with the CPX (which I am still learning to use and code with), I redrew it with a hopefully functional and detailed plan.
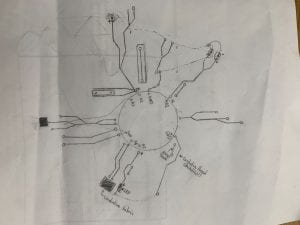
My plan; updated.
I try to take helpful advice in my planning to make it clearer to ‘read’ and functional, which, I believe, is something I was generally bad at at the start of the year. A good design should contain labels as to where the input and output is, be clear to the common observer with experience in reading designs, and also include components required to make the design a reality (I filled in a chart on the back of the paper, but only because prompted; In retrospect, I should make a habit of this, to ensure I have everything I need to start the project). Awareness of these things should help me become a better circuit designer as a whole, which I try to be.
Leave a Reply
You must be logged in to post a comment.