Kelly

"I have no special talent. I am only passionately curious" - Albert Einstein

ISB Backstage Tour: Spaces and Places

This is the proscenium of the ES theater. Proscenium is a stage between the curtain and the audience and it takes up most of the space in the theater. It provides space for actors to perform and also divides the actors and their stage world from the audience.


This is the thrust, an extended stage from the proscenium. Thrust has the benefit of multi-side views (3-side view), so it provides greater intimacy between performers and the audience than proscenium, which only has a 1-side view. It was really interesting how you could adjust the thrust to make a completely different style of the stage.


This is the side of a theater. There are seats for the audience to sit and watch a performance from the right/left/middle. The step-like formation allows the theater to save space and accommodate hundreds of guests. I personally prefer the seats in the MS/HS theater because they have more individual space and are much more comfortable compared to the ES theater- the seats in the ES theater don’t have a backrest or divider that separates one another.


This is the front light. These lights are hung in the front of the theater, over the heads of the audience, pointing at the stage. It allows the actors to be seen clearly by the audience. They also add more dynamics to the stage. I personally like the lights in the ES theater more than the lights in MS/HS theater, because they are much brighter (MS/HS theater’s lights are kind of dark/yellowish).


This is the left wing. It is simply the left side of the stage. The curtains move from the left to the center. There is also a small door to the cafeteria behind the left wing.


This is the right wing. It is simply the right side of the play. The curtains move from the right to the center.


These are the stage curtains. They are hung on the pipes and used on different occasions such as plays/performances. Their designs vary depending on the type of show; the curtains have also been designed to be fire-proof as they may get burned by the strong light. Theater curtains add special effects/dynamics and engage the audience in the show.


This is a cyclorama, a large white curtain that is used as a background device (covers the hollow space at the back). It can also be used with special lighting to create the illusion of sky, open space, or great distance at the rear of the stage setting.


This is the proscenium arch. It is a blackboard that surrounds a stage space, creating a frame around the scenery and the actors. It makes the stage more or less unified during a theatrical performance; when young students are performing, you can lower the proscenium arch to fill the open space, and when older students are performing, you can higher the arch to give more space.


This is the fly space. The fly system quickly and safely hoists components such as curtains, lights, sceneries, stage effects, and, sometimes, people. This system provides a clear/unique background for the audience to engage in the play. Full fly space is when all the curtains are hoisted up and no background is present on the stage.


The fly system space is located at the very top of the ES theater, so we had to climb up several floors to come up to this place. This place basically holds up and sustains the big, heavy curtains. Because it is newly built, the ES theater has better automatic curtain/drape pull-up machines compared to MS/HS theater. I liked looking around this space because it is a feature of theater that people do not get to see or notice often when they are in the theater as the audience. It was also interesting to see how these systems operate.


This is the screw. This is essentially the most important component in the ES theater as these small screws sustain all the wires for the curtains. If these get loose, they will damage the curtains and even other facilities. The red paint is painted in a straight line to tell if the wires got loose or too tight (if they are not aligned, it is a sign that the curtains might fall). Mr. Chris comes here every week or two to check if the red paint is aligned.


This is the front light control booth. It is located on the second floor, allowing operators to easily see the stage and shed light. The booth has LED lights, so it is much safer and cost-effective compared to MS/HS theater.


This is ES theater’s control booth. It is located on the second floor, so it gives a wide, whole view of the theater. This is a designated area for the operation of technical equipment, lighting controls, and soundboard. This place basically enhances the quality of performance/production through special effects. I personally think the sound booth in MS/HS theater is better because it is sound proof; the one in ES theater is not, so people must be careful and very quiet all the time.

Intro to Stagecraft

My name is Kelly, and I am a sophomore. This is my 7th year in ISB and I enjoy going out with my friends. I never had drama/art courses in high school, so I am really excited to be involved in stagecraft this year. I am interested in designing costumes and making different props. I’m a little concerned of drawings because I am not a good artist. I have little experiences with crafting, but I took product design last year. I am more interested in doing scenic design.

Blogpost #4: Reflect and Share

  • Show your final product through photos and/or video.

.     

  • Explain how it works/doesn’t work using scientific terminology

Newton’s cradle is a device designed by a French physicist named Edme Mariotte and named after an English mathematician called Issac Newton. It is a device that demonstrates the conservation of momentum. The Conservation of Momentum states that when two objects collide, the total momentum of the objects before the collision is equal to the total momentum of the objects after the collision. Therefore, “when the first ball of Newton’s Cradle collides with the second, the first ball stops, but its momentum is not lost, just transferred to the second ball, then the third, then the fourth, until it reaches the very last ball.” You can see this conservation of momentum as the last ball swings into the air with nearly the same momentum as the first ball. Thus, if two marbles are lifted into the air on one end and released, then two balls on the opposite end will swing in response. This continuous clicking ball is also proof of Newton’s law of the conservation of energy, which claims that energy can’t be created nor destroyed but that it can change forms. The cradle converts the potential energy of one ball into kinetic energy that is transferred down the line of balls and ultimately results in the upward swinging of the ball.

  • Explain the areas you were successful in the product/process

I was overall successful in making Newton’s cradle because I was able to swing and click the spheres. Newton’s cradle is a challenging device because if the measurements aren’t precise, the marbles do not click. However, I managed to calculate and successfully make the cradle work.

  • Explain the areas you need to improve in the product/process

I would like to improve the accuracy of the product because the measurements were a bit off, and the toy did not work as well as I expected. The lengths between the marbles had to be the same, but mine was not. Some were glued 3cm apart, while other marbles were glued 5cm apart. Therefore, the marbles did not move well. Another improvement is the thickness of the string. Mr. Hussack later advised that thin threads (or wires) help the spheres click better because they take less energy. If I have another design task later, I will use a very thin wire.

  • Explain the impact of this project on the environment and the potential client/consumer/audience.

This toy has a tiny bit of impact on the environment because it is environmentally friendly. I re-used waste materials when making the toy. All of the woodblocks were in the waste box, so I had to cut them into different shapes to use them. The strings and marbles were already at school, so I did not create extra waste. I am unsure if this would work, but I can also substitute metal marbles with round materials like round rubber balls (bouncy balls?) to prevent extra waste.

  • Overall Reflection

I really enjoyed this engineering assignment because this was a new challenge for me. As a person who does not enjoy science very much, designing a toy and learning from it was more effective. I learned new techniques, theorems, and solutions throughout this task. Overall, I was very successful in this class; however, I can improve on time management since I wasted some time, in the beginning, finding useless materials and designing a backup plan. I can achieve this by having more thorough, detailed design plans and backup plans in case the initial plan does not work.

Blogpost #3: Create and Improve

  • Day 1: February 24

I got approval for my design. So I started gathering a few materials that I needed: a big piece of wood board (the bottom) and 4 supportive column-shaped pillars. I used an electric jigsaw machine to cut the big wood piece and pillars into smaller sizes. As shown in my previous post’s planning, I cut the cardboard and pillars into 14×7 and 27cm, respectively.

The cutting process was difficult since I had never used an electric jigsaw cutter before. It was scary at first, but I soon learned to use it with the design teachers’ help. I was extra careful in this process because Newton’s cradle is a product that relies heavily on the preciseness of measurements.

  • Day 2: February 28

My day 2’s goal was to gather all materials and find a way to attach marble with a thread. Therefore, I used wires to put the marbles and the thread together. I first found 5 small metal balls weighing about 70 grams, some threads, and wires. My initial plan was to use smaller, more aesthetically appealing ones, but they were unavailable at the design center. I did not want to spend extra days or money on ordering marbles, so I decided to go eco-friendly and use the ones at the school. Then, I used a plier to make the wire into a horseshoe shape. The wire was really thin and small, so bending them into shapes was difficult.

Next, I glued each of the wires and the marbles together with a hot glue gun.

I tried to find more materials for the toy; however, I could not find a long stainless steel screw, the most important element in my device. I asked teachers if they could order or find any, but it did not work. It would take too long to arrive and was not environmentally friendly. Therefore, I had to make another alternative design/plan to back up my plan.

  • Day 3: March 2

I researched videos about Newton’s Pendulum, but most of them had really simple, unstable DIY pendulums made out of craft sticks. Because I wanted to challenge myself and make it stable, I decided to use woodblock (I used the same bottom and marble). However, to stand the heavy metal balls, I decided to use thicker wood cylinder blocks as the supporter. To replace the stainless steel screw, I will use a thinner cylinder block.

I will drill holes and use needles to fasten the blocks all together.

  • Day 4: March 4

I have gathered all materials for the toy, and I just had to assemble them together. I was going to use a needle gun to fasten the woodblock together. However, the design teacher advised that using a needle gun is unnecessary and might take too much time. Therefore, I used a hot glue gun to stick the blocks together. This saved a lot of my time since it was much simple.


I then hung the marble strings onto the frame.

After hanging the marbles up, I realized the toy did not work; the marbles would swing irregularly. Therefore, I looked back at some of the YouTube videos and images and realized my mistake. Some marbles were also hung shorter or longer than others- the lengths were all different. The design teachers also advised me that the marbles have to be in a perfect line for the toy to work. They also suggested gluing the marbles onto the wood pillars to become more stable.


Therefore, I realigned the marbles into a straighter line. This process was especially challenging since the threads were too thin and tricky to tie and untie.

The toy worked a little bit after putting the marbles in a straighter line.

  • Day 5: March 8

This was the very last day at the design center. So I made some small changes before taking pictures for the blog. I realized some of the marbles were still a bit longer than others even after I glued last class. Therefore, I glued a bit more to secure the threads on the wood stick. I also took some pictures in a nice, clean background for blogs posts.


Blogpost #2: Develop and Plan

  • Model/sketch your idea – sketch using multiple perspectives (by hand, ideally): label measurements/sizes, desired materials, fasteners/adhesives & techniques needed for construction

Techniques needed: Laser cutting, 3D printing (maybe?)

I got some feedback about the stability of the toy since the marbles are heavy and big compared to the size of the toy; therefore, instead of using a 3mm thick metal supporter, I decided to use a 10mm thick metal stick.

  • What techniques will you need to learn/use? How will you learn this?

Precise measurements and calculations are really important in making this product. Therefore, I will possibly need to learn some laser cutting or jigsaw machines for cutting the woods into different sizes I want.

  • Make a plan for time/schedule and check/bring/ inquire on materials
    EMBED/photograph/upload Models (annotated sketches) – please post it as large as your blog can view appropriately

Sketches/Models:

Schedule:

Blog Post #1: Define and Inquire

  • What is this engineering task?

This engineering task is to design, build, and refine a toy or a device that converts one form of energy to another form of energy. Students must show energy transfer, respond to a clear purpose and user, be original, durable, and safe, consider the environment, and make the product visually appealing.


  • What are you thinking about/interested in doing? (this should be multiple ideas/precedents)

I am interested in making these toys listed below; I will eventually choose one among these.

1. Balloon-Powered Car

This toy converts potential energy to kinetic energy and uses Newton’s Third Law of Motion

2. Newton’s Cradle Balance Balls

Newton’s cradle connects with the conservation of energy, momentum, and friction

3. Lava Lamp

This toy deals with buoyancy, heat transfer, and solubility

4. Catapult

Catapult converts potential energy stored in a stretched rubber band to kinetic energy

5. Rollback/Comeback Can

This toy connects with energy conversion (kinetic-> potential)

6. Bouncing Magnets

This toy uses Faraday’s laws of electromagnetic induction and Lenz’s law.


  • Embed images/links/videos of ideas you like/don’t like – comment on what you like or don’t like and why.

I liked Newton’s Cradle Balance Balls (Newton’s Pendulum) because this idea was simple yet challenging and interesting. This toy consists of a row of 5 metal balls- positioned to barely touch one another- suspended from a frame by thin wires. When a marble on one end of the cradle is pulled away from the others and then released, it strikes the next ball in the cradle, which remains motionless. But the ball on the opposite end of the row is thrown into the air, then swings back to strike the other balls, starting a chain reaction again in reverse. I also thought this toy was unique since I saw an interesting fact about how Newton’s Pendulum lasts about 3-5 years.


I did not like Lava Lamp because it was too simple and unchallenging. I needed 4 materials: vinegar, oil, baking soda, and food coloring. They did not require any other techniques except mixing, so I thought it was too easy.

  • Define the target audience/ problem/ audience needs you will address.

Audience: Children and young students struggling to learn physics

I decided to target children and young students struggling to learn physics because toys can make learning more fun. Whenever I was learning physics or science, I had struggles comprehending them; I would get tired of the lessons and science. But when I started using small science toys, I started understanding the concept easier and quicker. It would also make learning fun. Therefore, I will design a toy that can help students study better and effectively.

Problem: Safety (Materials used for the toy),

Questions: Would this toy be safe for young kids? What materials will be used to make it safer? How big will the toy be? How will I attach marbles and the string without any hook?

  • ANALYZE some of your ideas: What are the pros/cons of each idea? Think about this in the context of the constraints of the project, meeting the needs of the client/audience, etc.


Lamp

DI1: Clearly define the design problem including the target audience

  • Clearly describe, in detail, the design needed in your blog, with supporting images.

In the Padlet.

DI2: Analyze precedents to inspire and inform solutions to the design problem

  • Create (and embed in your blog) a Padlet that clearly shows a range of examples of similar design projects and examples of divergent inspiration.

Made with Padlet


DP1: Apply design thinking practices to generate divergent ideas

  • Show evidence that you have effectively applied design thinking (brainstorming, ideation matrix, and thumbnail sketching) to generate at least 30 divergent ideas.

Brainstorming

Idea sketching


DP2: Develop selected ideas into design concepts, applying feedback and/or self-reflection to clearly justify your decisions

  • Show evidence of the process of selecting your strongest ideas and justify your choices.

I have narrowed my designs to 2 choices: Lego lamp and letter lamp. However, I have decided to make a lego lamp as my final product because letter lamps are too common and are not challenging enough.

  • Make detailed 2D and 3D drawings that show the details of your chosen design.

Isometric drawing


CI1: Apply feedback to iterate and refine your design

  • Show clear evidence of gathering and responding to peer and teacher feedback.

I asked teachers and friends if my idea was feasible and “innovative.” Although I received some feedback in terms of the simplicity of the design, I would still face challenges. I need to decide the shapes, sizes, how the lights are going to be visible when painted, etc. Later in the designing process, I also got some valuable feedback about the boxes’ materials. Through the feedback, I was able to explore and look at different types of materials: acrylics, 3D printing, and wood.

  • Clearly show the process of refining your chosen design concept.

This was a simple design I drew after deciding on making a lego lamp. My initial idea was to make all “lego pieces” red with various shapes. They were really simple because, at this stage, I only have brief ideas or sketches.

However, I decided that red was too intense and would limit legos’ shapes after being built. Therefore, I decided to make them either black or white.

I was not able to show a picture of it, but I have decided to go with clear acrylic and get rid of these circle things on the top of the lego. The cylinder-shaped ones will take too long to make and would make hard for the user to build them in different shapes.

CI2: Demonstrate growth in technical and design skills

  • Show evidence of the technical development of your concept – which tools did you use, and what was the effect?

I started by making brief, simple prototypes with cardboard. My main goal in this process was to see if my “lego lamp” idea was feasible. I focused on measuring the proper size of the blocks and seeing if the LED lights fit in the lego boxes. I cut some cardboard to 10×10 and taped them. After making three cardboard boxes, I realized that the boxes were a bit too big, and they were all square boxes, making it difficult for me to build them into different, unique structures. Luckily, the LED lights did fit into the cardboard boxes. Therefore, I will make the next prototype smaller and vary the shapes (rectangles or triangles).

For my second prototype, I used laser cutting. I first used Affinity Designer to design the boxes; however, I realized that the boxes’ shapes weren’t identical. Some parts were shorter or longer than others. Therefore, through the teacher’s advice, I resolved this issue by using a website called MakerCase. MakerCase was a website that printed the box design when I put in the measurements. This time, I designed the boxes into 3 different sizes: 5cmx5xm, 5cmx10cm, and 5cmx15cm.

After printing the boxes, I taped them assembled them together. Diverse sizes of boxes made me easier to build unique shapes.

I made two more prototypes to test if the LED lights were still visible outside. Therefore, I printed 2 more boxes, one with clear acrylic and another with black acrylic. I will spray paint the clear acrylic box, compare it with the black box, and see which one has better brightness.

Making the clear acrylic box was not easy because it had lots of steps. I first had to laser cut the box, tape them together, use a small syringe to glue the pieces, and compress the cube with rubber bands.

The next prototype was the same box but printed in a black acrylic box. However, the black box was too dark, and the lights were not visible.

Therefore, I eventually decided to use a clear acrylic box and spray paint them in gray. This box had colors but was transparent, which made the brightness show up.

  • Show and describe how your knowledge has grown.

After lessons, I learned that making prototypes is a necessary process. Before, I always thought making multiple prototypes was unnecessary. I instead preferred going directly to developing the final model because it reduced time. However, these past few lessons really helped me acknowledge its importance because prototypes found out big and small issues before making the final product. For example, before making the first prototype, I did not know the 10cmx10cm boxes were too big. But after the cardboard model, I realized it and cut them into 5x10cm. I was also able to decide on the boxes’ color.

CI3: Create a high-quality design that effectively responds to the stated problemo

  • Create a design that looks appealing, functions effectively, and has no serious technical flaws.

For my final lamp, I decided to print 3 3cm boxes, 3 10cm boxes,  and 3 15cm boxes. They turned out very well. After cutting the boxes, I used plastic glue to put them in shape. The glue was specially designed for putting plastics together; it was really watery. The gluing step was actually a bit inconvenient because there were many steps to follow. I first had to tape them into 3D-shaped boxes- it was really important to cover all sides with tape. Next, I had to use a syringe and put the plastic glue into the sides of the boxes. Then, I used rubber bands to fix them.


After putting all pieces together, I spray painted them in gray. This process was quite interesting and fun since I have never tried spray painting. I had to be extra-careful in this process because the paints were extra-toxic.

Unfortunately, I was not able to fully finish the lamp. However, I really like how the boxes turned out. The color was really cool- shiny but somewhat matt at the same time. The sizes were also perfect for making new shapes.

RS2: Using the success criteria, explain the strengths & weaknesses of the process & product, including the impact of the design on the audience and environment

  • Describe how your final product is an effective response to the design brief.

Although I was not able to fully finish my lamp, I think it is pretty effective for my user, “Miles.” I was able to make a design that suited his interest which was “architecture.” My lamp was stackable and was able to turn into different forms.

  • Reflect on what you would do differently next time and why.

If I had more time, I would definitely work on finishing the lamp. I would put the LED light straps into the boxes and actually try them out. I would also like to change the color of the spray paint or paint it more thinly (not paint several layers) because it was too dark for the lights to show up. Printing the boxes with different materials for the boxes would also be another interesting challenge when I try this lamp unit next time.

  • Why is your lamp design a good response to your design brief?

My lamp is a good response to the design brief because it shows growth and progress. I have experienced several different steps of revision, prototypes, and mistakes to build my final model. I also learned the importance of prototyping and researching before making the final model.

  • Write about the function of the lamp (How it works)

My lamp’s main purpose is “being able to build into different shapes.” You can change into different forms whenever you want to; it is simply like buying a new lamp!

  • My target user would like my lamp design because…

My target user, Miles, would like my lamp design because it is related to architecture. Because he is interested in architecture, he can apply it to building legos. The boxes’ color is also really cool.

Storable Glasses- Precious Plastics Eye Glasses

1. Your Padlet of inspirational ideas, including: 

  • Images & examples that show your chosen user (fashion style, interests, etc.)

Design Problem: Design effective glasses that suit my targeted audiences: Readers and writers (simply people who read and write a lot; students, possibly)

My glasses will be…

  1. Fashionable and visually appealing
  2. Comfortable (light in weight)
  3. Storable
  4. Unique (Color, lens shape, etc)

I decided to make glasses for readers and writers because I, myself faced multiple challenges while reading and writing. Whenever I needed to quickly write some notes down, I always forgot to bring pencils; I had to go get them from my bag or my room. It was simply inconvenient. Therefore, I want to design beneficial glasses that have places to store small objects like pencils and erasers. This way, it would be much easier and convenient.

The Padlet below also shows my connection with my users and the development of my ideas. I first gathered characteristics of authors: reading, writing, dressed fashionably, comfortable, and creative. I also noticed they have to carry many stuffs like pencils, notebooks, and erasers because they go through endless writing and revising processes at any time. I thought this would be inconvenient since they might have to carry pencils anywhere they go and might forget. Therefore, I made a connection and thought it would make their lives much more convenient if they have places to put small items in their everyday items: glasses. Therefore, my glasses are going to be storable.

  • Examples of glasses (Padlet)

Made with Padlet

Researching on Padlet really helped me organize ideas about my user and glasses. I first gathered lots of random examples of glasses that seemed interesting and unique. After deciding on the user, I narrowed the research range and searched for specific styles of glasses.


2. Examples of brainstorming:

  • Mindmap

  • Ideas matrix

3. Lots of rough sketches of your early ideas:

  • Everything you have sketched so far!

I drew many sketches of glasses that would fit my user. Some of them are very random; however, I thought it would be a good practice to draw them. After doing many sketches and research, I have decided to make storable glasses for authors (my user). My glasses will have small places to keep small objects like pencils or erasers.


4. Developmental drawings of more detailed concepts:

  • Orthogonal & isometric (3D graphics)

These are the actual measurements of my glasses.


  • Vector shapes for laser cutting

Affinity Designer Practice


  • Laser Cutting Shapes  Drawn in Affinity Design

I have narrowed the glasses’ designs to 5 different shapes: square, heart, round, star, and round star. I drew these 5 shapes because I wanted to see if having “fashionable” shapes like heart and star distract people. I also made the shapes (lens) a little bigger than the usual size because I prefer glasses with big lenses.


  • Printed-out Cardboard Prototypes

I was actually very pleased with my printed cardboard prototype. It was not too fashionable and not too boring.


5. Visible evidence of feedback and decision-making:

  • How did you collect feedback from peers and “user”?

I asked my friends for critical feedback about my design, specifically, if the designs made sense and were actually helpful for “the users.”

  • What was your response to the feedback you received?

My friends told me the designs made sense; however, I received some feedback regarding the lens’ shape. Specifically, the unusefulness of fancy shapes since the sharp or round edges may interrupt the users from concentrating/writing. Therefore, I went back to the mindmap and looked through all my notes to see if the unique lens shape was needed. Eventually, I decided to get rid of the heart-shaped-lens and use a square-shaped lens.


6. Create:

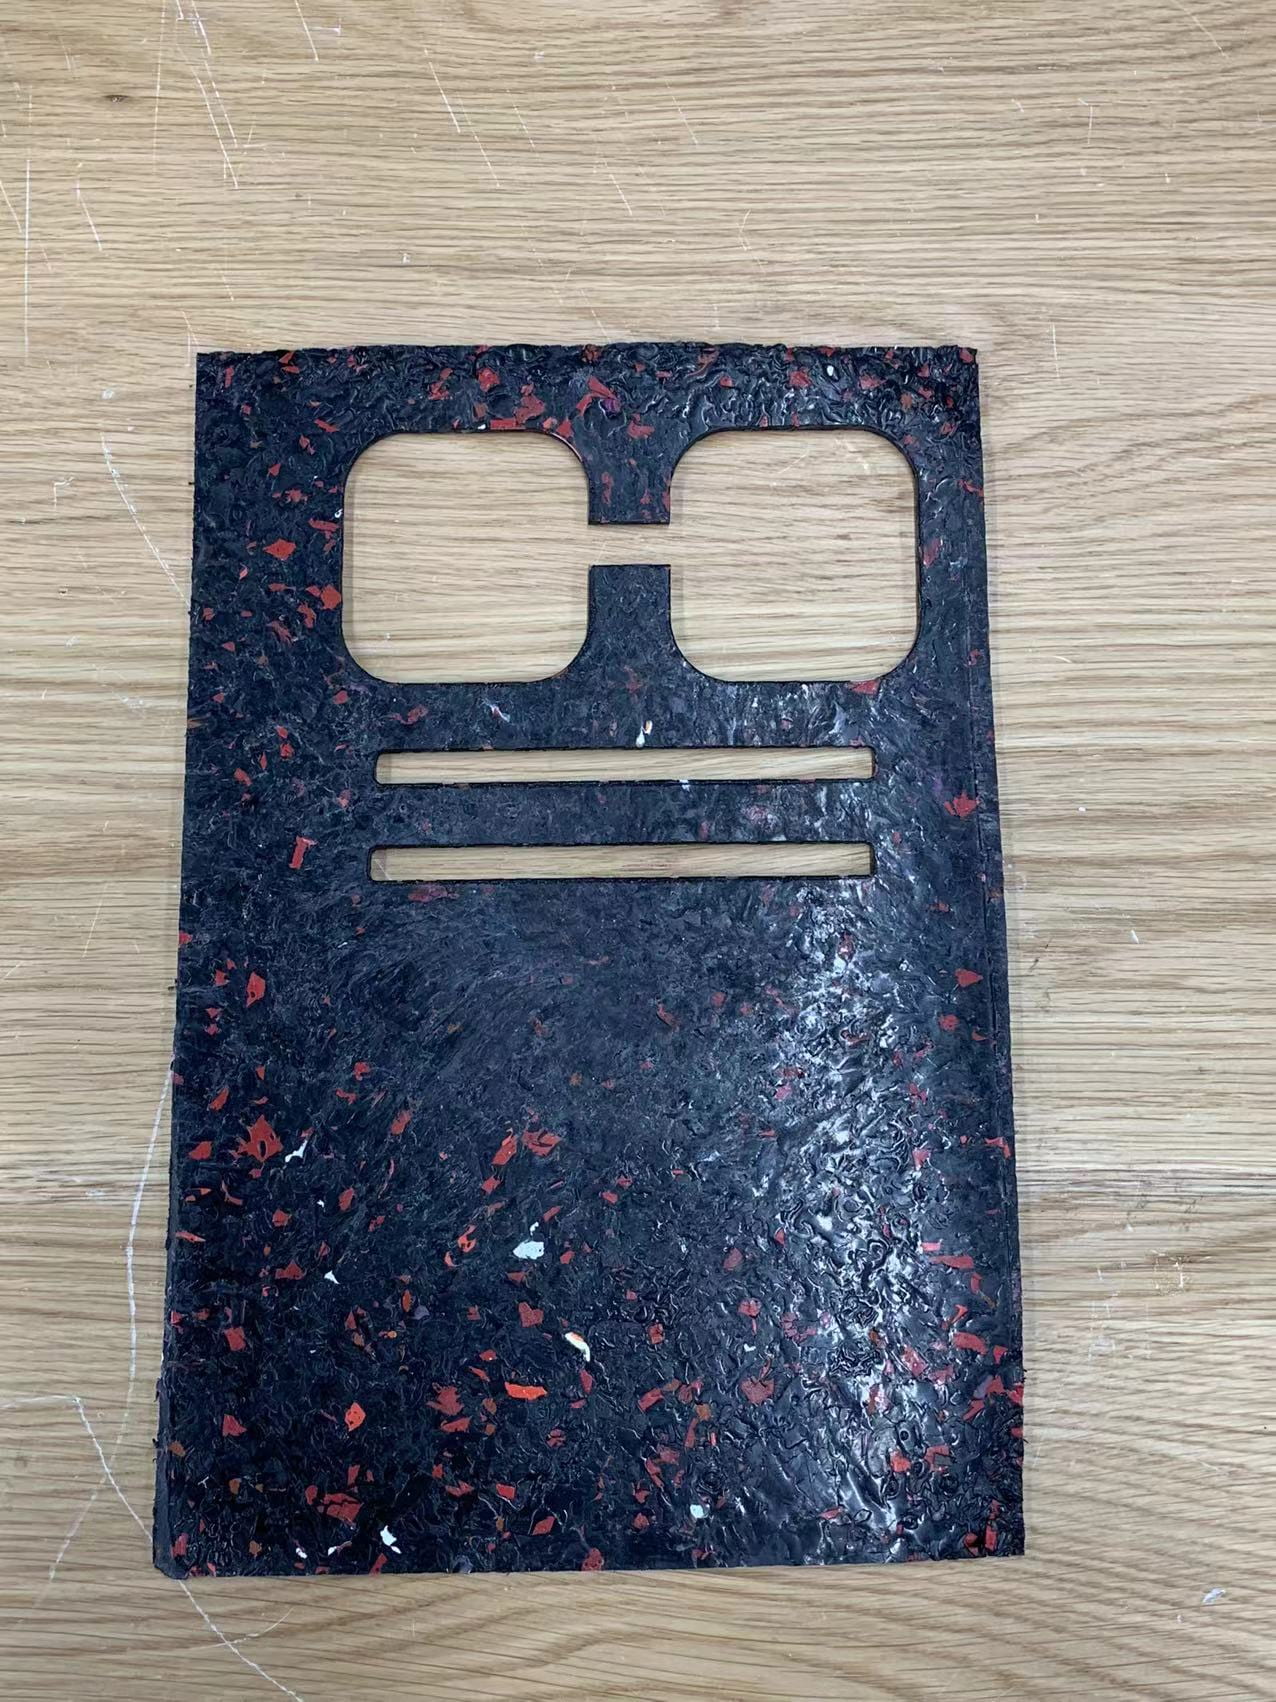
I decided to re-use some plastics at school to make my final glasses since it is eco-friendly, and I have always wanted to try out these plastic materials. I wanted my glasses to have black as the base color and some bits of pink. So I went to the plastic-collection area (behind the MS/HS cafeteria) and collected lots of black and pink plastics numbers 2 and 5. It had to be plastics numbers 2 or 5s since they were the only ones that did not emit any toxic gasses during the melting process. One issue I faced during this process was collecting enough plastics because plastics at the plastic-collection area were not enough. I initially thought there would be lots of plastic wastes, but It was actually quite hard to find numbers 2 and 5. Most plastics at home and around the school were all number 1s. Therefore, to resolve this issue, I asked my friends to hand me some plastics that they are not using. After collecting enough of them, I re-washed the plastics with soap and dried them completely for 2 days.


After 2 days, I shredded them and melted them into a plastic sheet. During this process, I actually faced another problem: the pink plastics and black plastics could not be mixed together. The pink was actually a number 2, and black plastics were number 5. If we melt them together, it will emit huge amounts of toxic gas. Therefore, instead of using pink plastics, I decided to use some red. Red also turned out pretty well because it gave a natural and unique blend with the black.


I cut the plastics into the shape I had designed previously. Then, I glued the bridge and the glass part together. This process was a bit challenging for me because the plastics did not stick well, even when I tried gluing with a hot glue gun. Therefore, I had to glue multiple times to make layers of glue.

I am overall very proud and satisfied with my final work. I liked the unique color that had small bits of red and orange. However, I personally feel I could have made the plastic sheet a little thicker because my sheet was too fragile. The bridge kept broke, so I had to glue the glasses together. I also could not make the glasses “storable” because the plastics were too thin; they did not stay still. Therefore, next time, I would like to try making the acrylic glasses keep them stable. The last thing I can improve is making the edge of the bridge more round so it feels more comfortable when you wear it; mine was too “edgy,” so it was kind of itchy.


I made a poster of my final glasses. Even though my actual glasses were not storable, I tried to show my original idea to the poster.


Product Design Eyeglasses

Made with Padlet

The Paper Menagerie Analytical Writing

In Ken Liu’s short story “The Paper Menagerie,” Jack’s identity changes and develops through the use of symbols, dialogues, and actions.


In Ken Liu’s short story, “The Paper Menagerie,” the setting emphasizes the disconnection between the protagonist Jack and his mother. Specifically, living in the United States resulted in a young Chinese-American boy, Jack, to grow apart from his mom’s Chinese culture. For example, when Jack and his family first moved into a new house, their neighbors claimed, “The child looks unfinished. Slanty eyes, white-faced. A little monster… That doesn’t sound very Chinesey.” This quote may have led Jack to think that his Chinese identity isolated him from society, eventually leading to hatred towards his mother and the Chinese part of life. In addition, when Jack’s friend, Mark, visited him, Mark stated, “That doesn’t look like a tiger at all. Your Mom makes toys for you from trash?… I had never thought of Laohu as trash. But looking at him now, he was really just a piece of wrapping paper.” Again, Jack’s surrounding people are mocking him about his Chinese identity. Therefore, Jack may have felt “annoyed,” leading to disconnection with his mother.

« Older posts

© 2024 Kelly

Theme by Anders NorenUp ↑

Skip to toolbar