About this unit:
This unit is all about Laser cutting. We got to choose between designing a locker phone holder, or a LED Lamp as we didn’t have time to do both. Our class got introduced to Fusion 360, a useful program that helps with designing for laser cutting. We set up our entire project on Fusion, and then used Light-burn, a program that helps laser cut. After we got our laser cut pieces, we used wood glue to glue them together and got to choose between how we wanted to coat it (staining, acrylic, markers, etc).
Ideas into Design Concepts:
When I just started this unit, the initial plan was to create a locker phone holder and then create a LED Lamp, but due to online learning and other challenges, we weren’t able to do both, so we had to choose one. In my class, we first looked up existing phone holders to get ideas for the kind of holders we wanted to construct. This image displays some of my research and the sources that I used to generate my initial design ideas.
My initial phone holder shape research designs

With that, we practiced isometric drawing, which was really difficult at first, but with further practice, I gradually got the hang of it. The isometric drawings I’ve done are in this image. Then, my class drew three designs for our locker phone holder using the isometric drawing approach, and gave each other some feedback (There won’t be a photo for this one as I don’t have the paper with me). I first wanted to add more boxes to the phone holder so that it could hold more items, but I later discovered that you can’t have anything in front of the phone holder since the magnet is insufficiently strong and there won’t be any room for the designs I want to laser cut on. So, I included a few places to put other things at the sides of the phone holder. After that, I made a mood board with potential designs for my phone holder. I just incorporated all the ideas I liked and felt would look good carved on wood because I didn’t really have a theme yet. The following picture is my mood board. We also had to measure our phone to see how big our phone holder Mood board for Phone Holder (1st)
 would be. Unfortunately, the advent of online learning significantly reduced this project’s efficiency. We came to the conclusion that there wouldn’t be enough time to complete two projects, so we filled out a form to select just one. I selected the LED lamp. Based on my favorites from the last mood board, I made a new one with a theme this time. I chose nature as my theme because I find it to be peaceful and since there are numerous ways to design it. Here is a photo of my most recent mood board:
Mood Board for LED Lamp (2nd)

It was a difficult decision to eliminate some of my designs. But I eliminated the wave and bird design after taking into account their complexity and compatibility. I initially wanted to do the tree design and the moon design, but I realized that these two doesn’t match and I didn’t want to end up with a lamp that feels not organized. The leaf and tree design can represent a leaf falling from a tree, thus I quickly made the decision to utilize it.
My LED lamp is light green for the leaves and dark green for the tree design. I would say that I would make the light green color a little bit darker if I were to do this again. I blended white and dark green to create a more complementary color because there wasn’t any light green paint that I wanted to use, but I should have added more dark green. I’ll definitely do better at this the next time. In addition, I would not use acrylic paint next time (staining would be better). Even after the acrylic paint had dried, it was still a little sticky, and some dust/little objects got stuck to it, so I had to scrape them off. The paint also made it tougher to join the pieces together because there was some dried paint on the sides (I also had to scrape that off). Apart from that, I don’t regret using acrylic paint because the colors may represent nature, and I enjoy watching each brush stroke.
I choose to utilize a color-changing light bulb since I believe the color of it can significantly alter the ambiance of my entire space (photo not yet available due to light bulb’s delayed arrival). I can choose different colors, and in my perspective, having more alternatives is preferable to having less possibilities.
This is how all the ideas I had in November developed into the layouts I used for my finished project. The following image shows my finalized design: 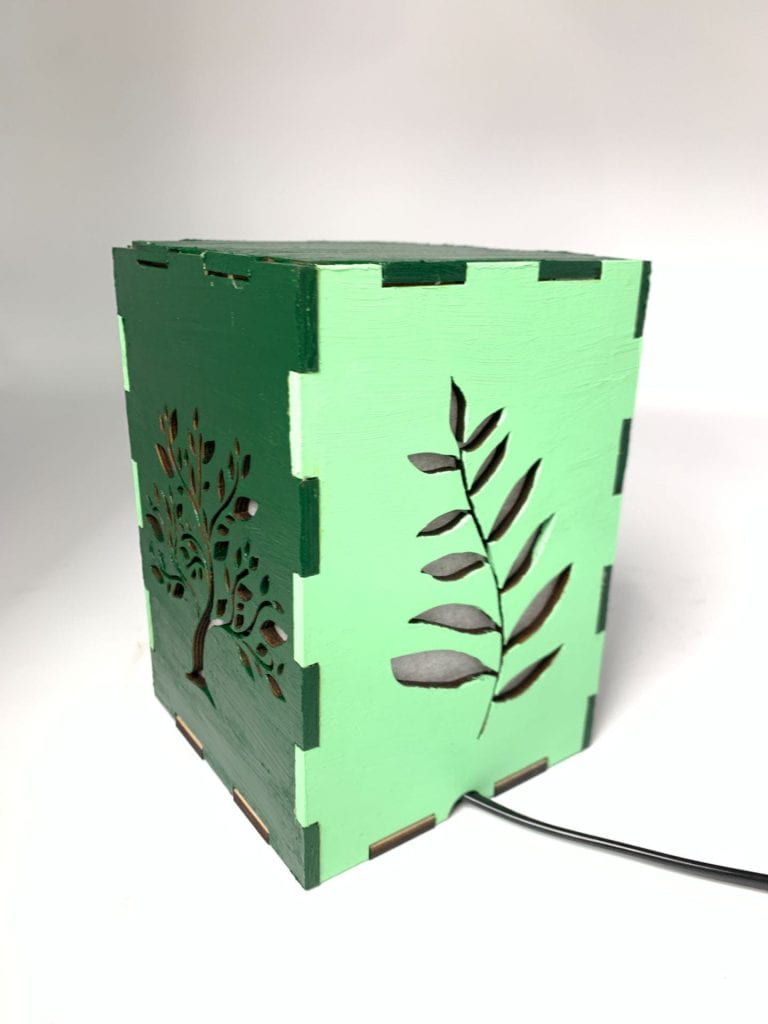
Growth in Skills:
Throughout this course, I definitely learned a lot about Fusion 360. I struggled at first to apply the fundamentals, but as I continued, I picked up more and more information until I finally understood it. When my class first learned about fusion, we viewed a number of instructional videos to understand how to use the basic tools that would be required. These tools include cutting, trimming, making shapes symmetrical, and creating various shapes. We tried a lot and produced a lot of small sketches; you can see a few of mine in that picture.


We eventually found our designs, and I learned how to import them into Fusion so I could create a sketch of the identical design using the tracing tool. This tool was really easy to use and was quite helpful. The image below shows how my design appeared after being traced. But once I was done sketching, I had a lot of difficulties moving and scaling it, and I really needed a lot of assistance. There are many other ways to scale and move an object, but for me, moving an object is the simplest when I pick the entire thing and press “m.” My teacher guided me through a procedure for scaling, and it was incredibly beneficial. My teacher taught my class how to utilize Makercase, a very helpful website that makes making the fingers for the boxes more simpler. I learned how to combine these sketches into one and put them together so they could be loaded into Lightburn (an app used to laser cut). Here are a few images of my completed designs.


After seeing a video my teacher made on DX, I learned how to use Lightburn when my Fusion sketch was ready to be laser cut. I imported my design from fusion onto Light-burn. Red is for cutting, black is for etching, and blue is for coloring in.

Online learning was one of my biggest challenges. The hardest part of this class was learning about Fusion through online instruction. I had to share my screen every time I asked a question and follow to my teacher’s directions. In class, my teacher could simply show me how to do it; however, if it were online, she would have to direct me as to where to click, which reduced the effectiveness. In addition, I could ask a friend for assistance in school. But during online learning, I had to ask my teacher even the most basic questions. Everyone was asking the teacher a lot of questions that another student could easily answer, which increases the teacher’s workload and everyone had to wait while their questions were being addressed. Another challenge I encountered was when Fusion took up a lot of space on my laptop and frequently crashed. I waste a lot of time closing Fusion, restarting my laptop, and opening it again every time it freezes or has a malfunction.
Reflecting & Sharing:
If I were to take this course again, I would definitely want to study about Fusion 360 on my own before starting this unit. I made no particular effort to become familiar with Fusion when setting it up with my class at the beginning of this course. I wish I had conducted some independent research since it would have sped up my understanding of what I had learned. Don’t take your time for granted is one piece of advice I would recommend to others. Despite the setbacks of online learning, I think that if someone had a positive approach about learning, they could still complete this project without too much difficulty. Next time I do something similar, I’d like to finish it right away, avoid procrastinating, and come to design during flex to do some extra work (even if I’m not behind). Since you can never predict when something may occur, it is essential to take all reasonable preparations to be ready for it.
I feel like I have challenged myself and put a lot of efforts into completing this project. However, this time, I used Maker case (as I’ve previously said) as a shortcut while creating the fingers on the boxes. If I had created these fingers by hand, it would have been a greater challenge for me. So the next time, I would rise to the occasion and avoid cutting corners.
In my opinion, this course was fantastic and enjoyable, however, but next time maybe add a few more videos so everyone can watch the videos instead of asking the teacher how to do each step. Additionally, I understand that there was a lack of spare time, but perhaps next time we can do a gallery walk to discuss our designs for the LED lamp and provide feedback to one another (we did one for the phone holder). I believe that the section where everyone learned how to use Fusion should be kept. It may be argued that the activity wasted a significant amount of class time or that some students didn’t find the tools helpful for their final project. However, I think it was a good way to start this course off, but no matter what you do, you have to master the fundamentals before moving on to more difficult tasks.
Overall, this has been an amazing unit and I am so glad to be a part of this. Reflecting back to the beginning of this unit, I have gained so much knowledge and improved myself as a learner. I will definitely do something similar to this in the future!! Thank you to everyone, especially Ms. Kim, who supported me and helped me throughout this unit.
Recent Comments